If you're looking for an answer on how WooCommerce and WordPress work together, you've come to the right article.
WordPress is the most popular content management system (CMS) for helping teams build a website and manage the content distributed on it. It's open-source software, meaning it's free to use and modify.
WooCommerce is one of the most well-known e-commerce platforms. It's also available as a WordPress plugin that turns any WordPress site into a fully customizable online store. With the WooCommerce plugin, you can easily sell your products or services, accept different payment methods, monitor inventory, and add shopping cart functionality to your existing WordPress site.
Although WooCommerce is free to download, there are a few things you'll have to consider if you'd like to build a site with e-commerce functionality, such as a domain name and web hosting, both of which cost money.
In this article, we'll walk you through why WooCommerce is a great choice for building your online store, how to install it in WordPress, what you'll need to set up a WooCommerce store, and a few of the best email marketing plugins you can use in tandem.
FYI: This article is part of our WooCommerce series that covers how to set up WooCommerce with WordPress and the plugins, integrations, and software you can leverage to transform your WordPress site into a fully-fledged, powerful e-commerce store that drives revenue.
Stay tuned for more at the end of the article.
Why WooCommerce is so popular
It's no surprise that when it comes to e-commerce plugins for WordPress, you have dozens of options. Just a few of them include WP Shop, WPecommerce, Jihoshop, MarketPress, and more. All of these plugins do offer the features you need to set up an e-commerce store, but there's a reason WooCommerce stands out from the crowd.
Firstly, WooCommerce was created specifically to work with WordPress, the CMS that powers 43.2% of all websites, with an even higher market share of 62.8%.
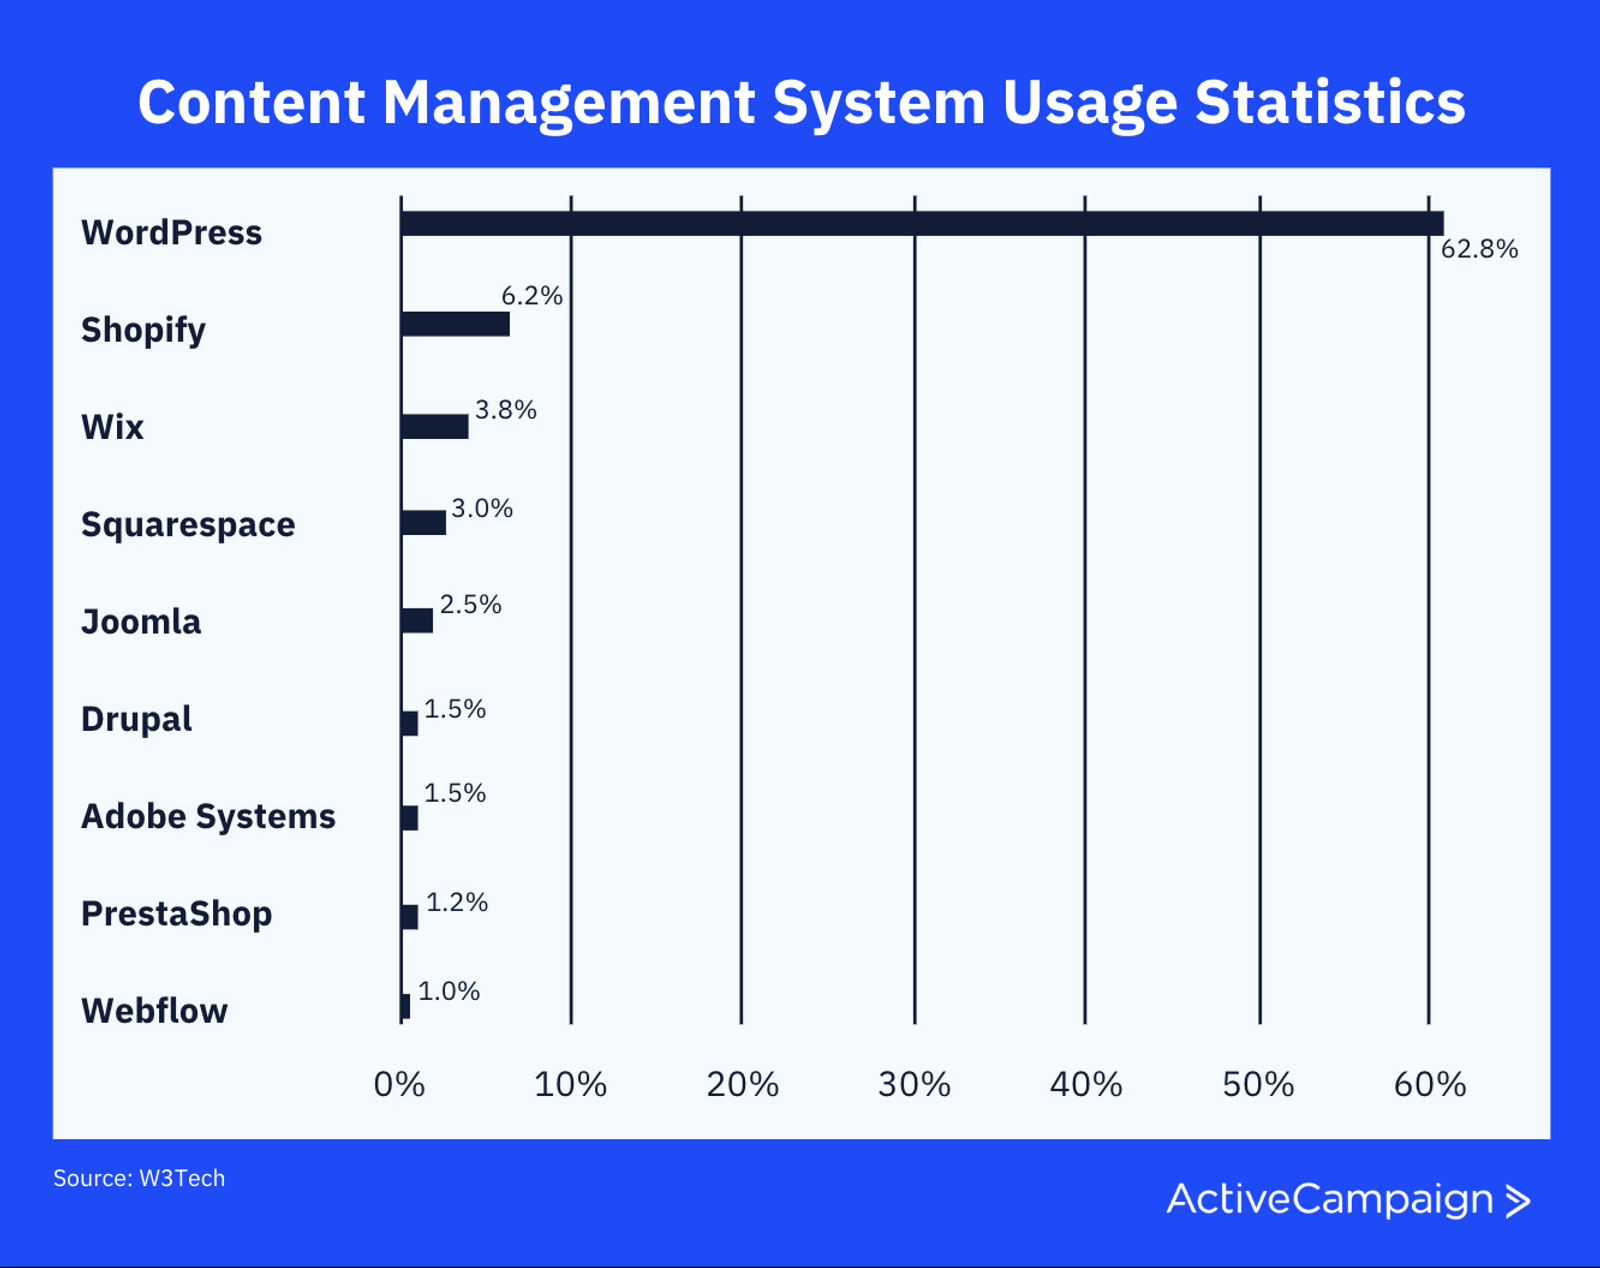
Being developed for the world's largest content management system already gives WooCommerce major leverage. And because WordPress is open source, users who choose it get to retain all the rights to the content that they publish on their sites, unlike other CMS platforms that have a hand in controlling your data.
WooCommerce understood that WordPress empowers its users and built onto that vision. The e-commerce platform and plugin preserve the foundational function of the basic WordPress experience while adding to it with e-commerce functionality and configuration. Because it follows the same principles as WordPress, WooCommerce feels familiar to long-time WordPress users, making it that much easier to adopt.
Today, WooCommerce is the most powerful WordPress e-commerce plugin available. We'll get into this a bit later.
WooCommerce's popularity can be attributed to several key factors:
• Free core plugin: The core WooCommerce plugin is free to download and use, lowering the barrier to entry for new e-commerce businesses. While there are premium add-ons available, many essential features are included in the free version.
• Extensibility: WooCommerce offers a wide range of extensions and plugins that add specific functionalities, such as payment gateways, shipping options, marketing tools, and more. This extensibility allows store owners to tailor their online stores to meet their specific needs.
• Scalability: WooCommerce can handle a range of store sizes, from small businesses to large enterprises. It is capable of managing extensive product catalogs and high-traffic volumes, making it a flexible solution for growing businesses.
• SEO-friendly: Built on WordPress, WooCommerce benefits from strong SEO capabilities. Many SEO plugins are available that can help optimize product pages, category pages, and other aspects of the e-commerce site to improve search engine rankings.
• Mobile-friendly: WooCommerce is designed to be mobile-friendly, ensuring that online stores look great and function well on mobile devices. This is crucial as more consumers shop using their smartphones.
If you're thinking about installing WooCommerce, keep a few things in mind. The experience of creating an online store will be different from that of other platforms specifically dedicated to e-commerce, like Shopify or Magneto.
You'll know WooCommerce is a good fit for your business if:
- You want to create an e-commerce storefront that's not just a store but also a full website with a blog and landing pages. WooCommerce is a great choice for businesses looking for both e-commerce functionality and content marketing in one.
- You want to have total control over your e-commerce store. Other platforms limit you and will sometimes not allow you to set things like SEO parameters (URL slugs, meta descriptions, etc.). WooCommerce doesn't restrict you. You're able to edit and customize everything on your site.
- You need a platform that will support your e-commerce business as it scales. Not only does WooCommerce give you the power to build simple storefronts, but it can also handle more complex features like additional payment methods. You can start with payment gateways like Google Wallet and PayPal before graduating to SSL for a more optimized checkout experience.
- You don't want to pay for a monthly subscription or commissions on every sale. Other platforms charge you for simply running a store. WooCommerce is a free plugin.
Why WooCommerce and WordPress work together
As we mentioned earlier, WooCommerce is an open-source e-commerce platform that can be easily installed into WordPress. This means you have full ownership of your online store's content and data forever. When WordPress and WooCommerce are paired together, you get a truly powerful customer experience on both the seller and buyer side.
This e-commerce plugin and CMS combo blends content and commerce beautifully. WordPress and WooCommerce give you the opportunity to drive revenue with a shopping cart experience that actually converts, have a better chance of appearing at the top of search results because of WordPress' advanced SEO features, and sell subscriptions or memberships with WooCommerce's developed-vetted extensions.
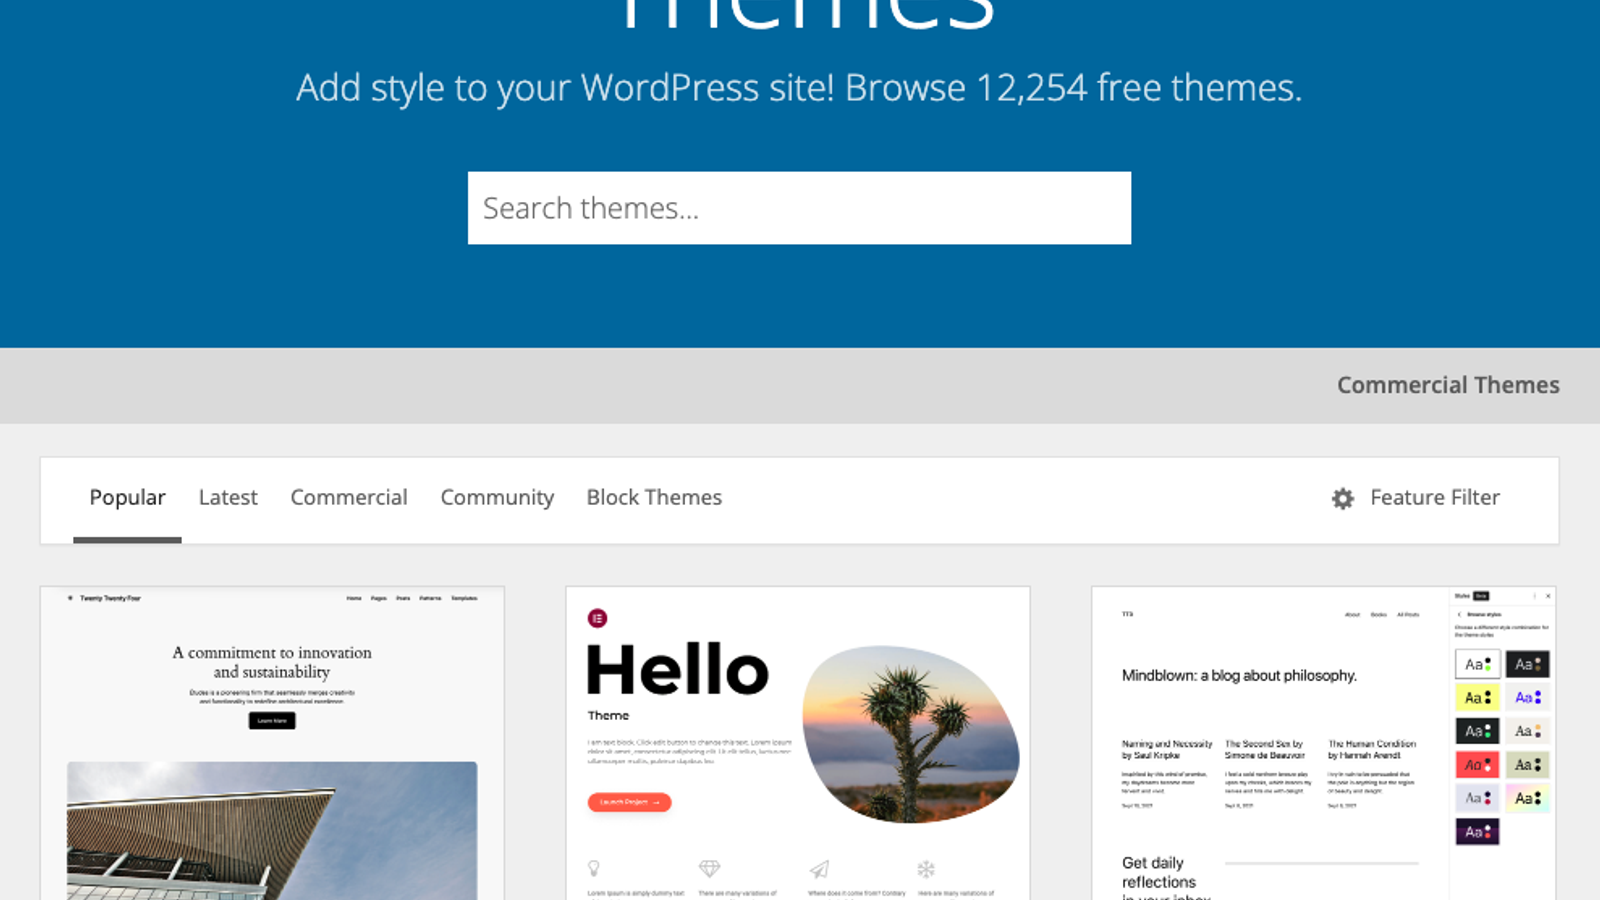
Not only this, but WordPress has thousands of themes you can use to build engaging storefronts. With that selection, you're sure to find one that properly suits your unique brand voice and industry.
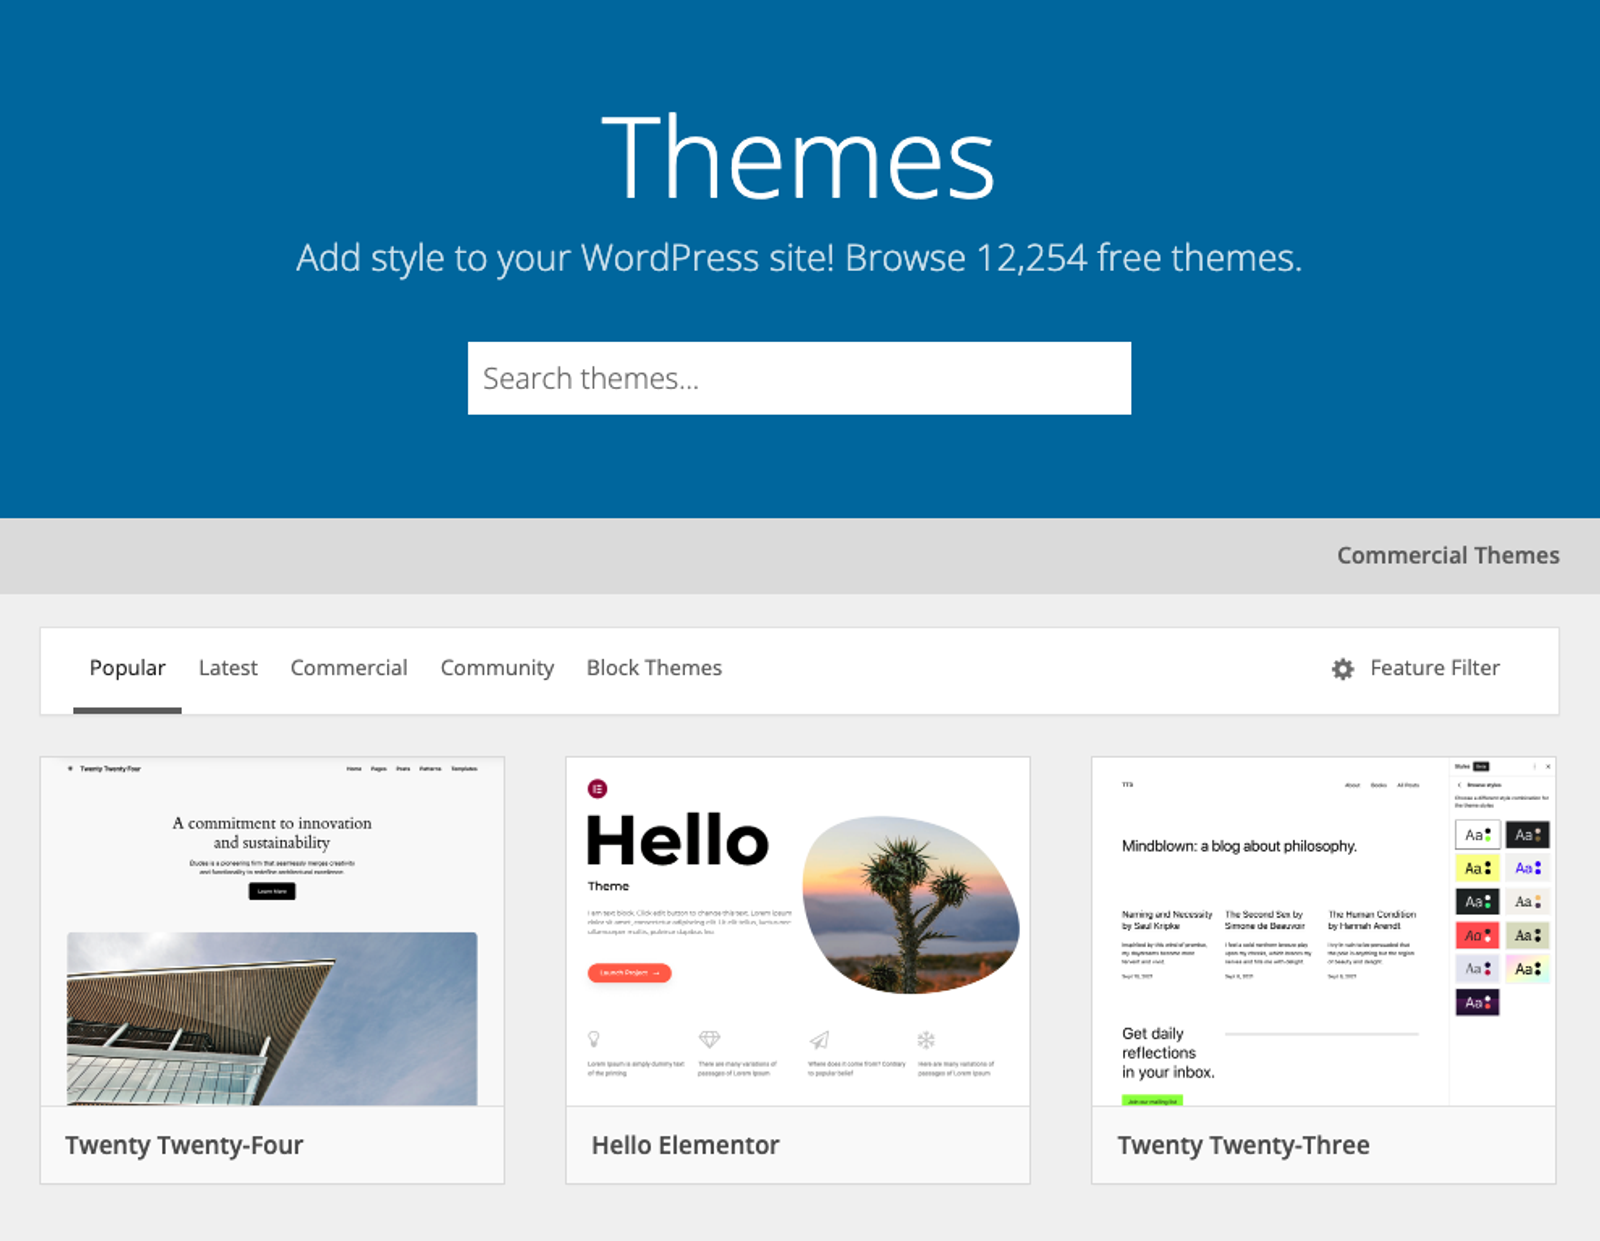
Pairing WordPress and WooCommerce is a recipe for e-commerce success. Before we dive into the installation process, let's talk about what you'll need to have before you can create your WooCommerce store.
What you’ll need to create a WooCommerce store
Before you install the WooCommerce plugin and create a site from scratch, there are three things you need to have.
✅ A WordPress hosting account. This is where your website lives. Think of it as your site’s home on the internet. Every single blog will need web hosting.
✅ A domain name. This is your blog’s address. It’s what people type to get to your website (www.activecampaign.com)
✅ An SSL certificate. This will allow you to securely accept online payments.
These three things will cost you money even if WooCommerce is free. There is no getting around these costs. To build any kind of site, you will have to pay for these items; they’re not specific to WooCommerce alone. The price you pay for them combined will depend on the services you choose to invest in. If you're just starting out and don't want to invest a large chunk of money upfront, you can select the plan based on the bare necessities.
As your business grows and you continue to customize your site, you can add other features and upgrade your plan to accommodate your needs.
Typically, a hosting account, domain name, and SSL certificate will cost you about $180 for a full year, but each service will run you different prices, and you can take this price down a bit. For example, a WordPress hosting account will cost about $4 a month, and your domain name is free for the first year.
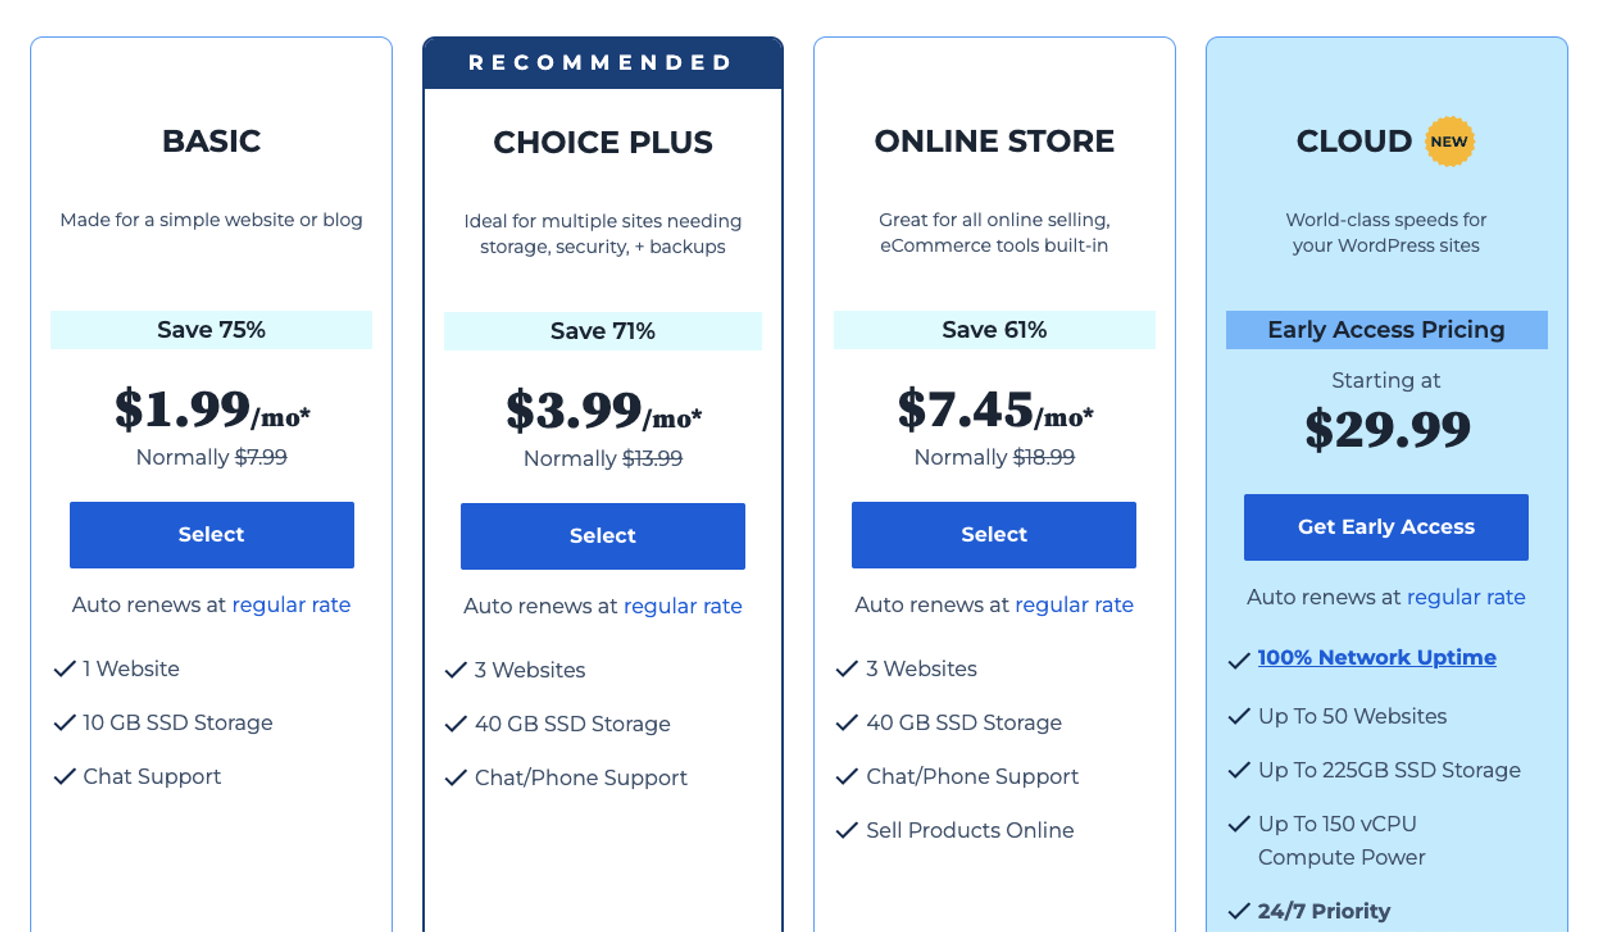
There are different "loopholes" you can use if you're just getting started and want to keep your costs down as much as possible. We've written an entire article to help you go from zero to a full-blown WordPress site (with all the fixings) in about thirty minutes.
Adjusting your WordPress site settings
Before you install the WooCommerce plugin, it's important (especially for first-time site owners) to set up some basic settings in WordPress. If you've had your site for a while and have already adjusted these settings, skip down to the “How to install WooCommerce” header.
Navigate to the WordPress admin dashboard and click on Settings in order to change your website's title and tagline.
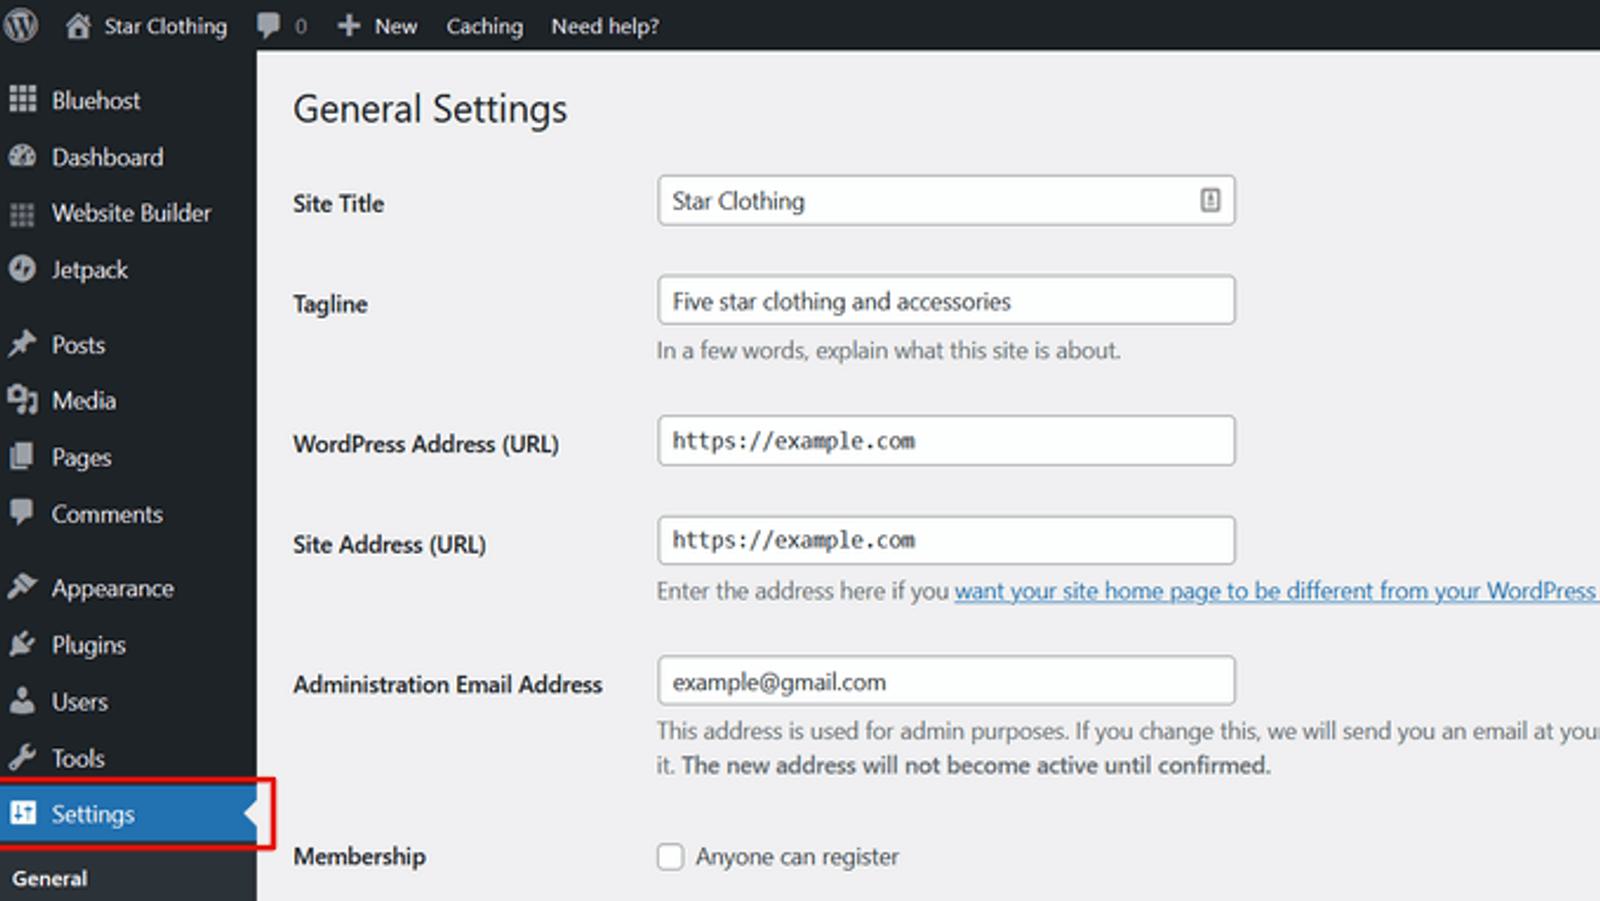
Next, make sure your URL appears as ‘https’ and not ‘http’. Why? If you choose Bluehost as your hosting service, it'll automatically install your SSL certificate for your domain. If your URL is showing up as http, you don't yet have an SSL certificate and will need to enable free SSL.
Next, make sure the administration email address is directed to you or the person managing the website. Whatever address you enter here will receive any notifications coming from either WordPress or WooCommerce.
Once these things are confirmed, review the settings on the page once again and then click the Save changes to save them. It's time to install the WooCommerce plugin!
How to install WooCommerce
If you've installed other plugins on WordPress, this process will be familiar to you. First, go to your WordPress dashboard, click Plugins, and then Add New.
Note: You can also install it manually by downloading it from this page.
Search for ‘WooCommerce’ in the search bar. Once it shows up, click the Install Now button.
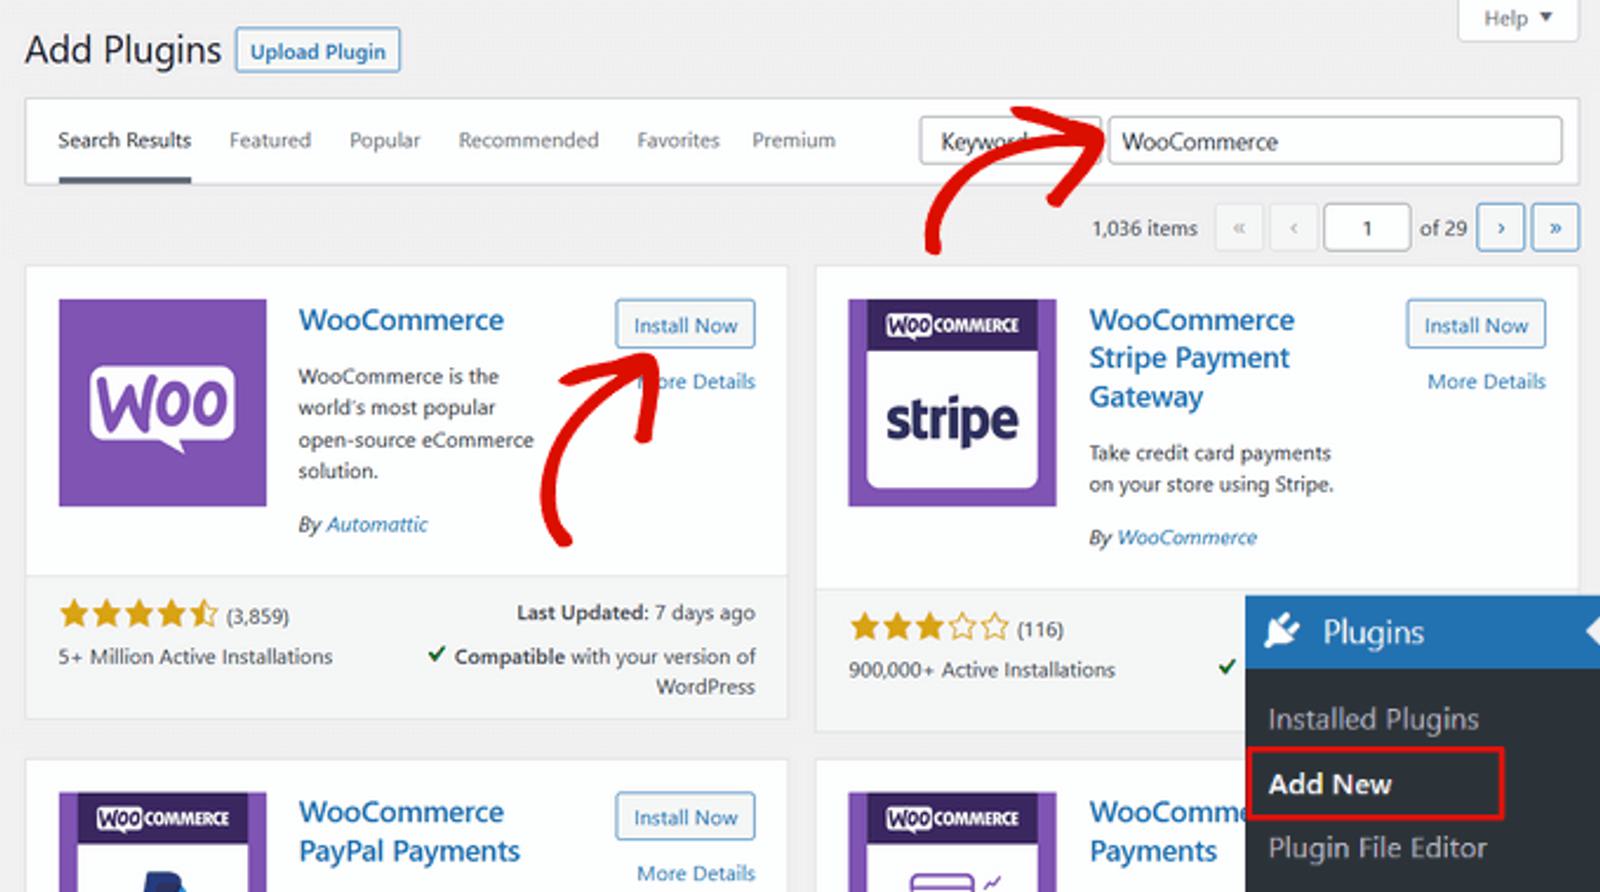
Once the plugin is finished downloading, click the Activate button to begin using it. Doing so will launch the WooCommerce setup wizard that will walk you through a few steps to properly install the plugin.
First, you'll be asked to enter your store location. This is important because, depending on your chosen location, this will determine the shipping costs and taxes on the invoices by WooCommerce for WordPress.
You'll also be asked to select the currency you'll accept, the payment platforms you will integrate with your WooCommerce store, and the type of products you plan to sell.
WooCommerce will give you three options to choose from:
- I plan to sell both physical and digital products
- I plan to sell physical products
- I plan to sell digital products
Once you've entered all of this information, click Continue. As you are guided through the setup process, you'll enter things like your product type, industry, and a handful of other details about your business.
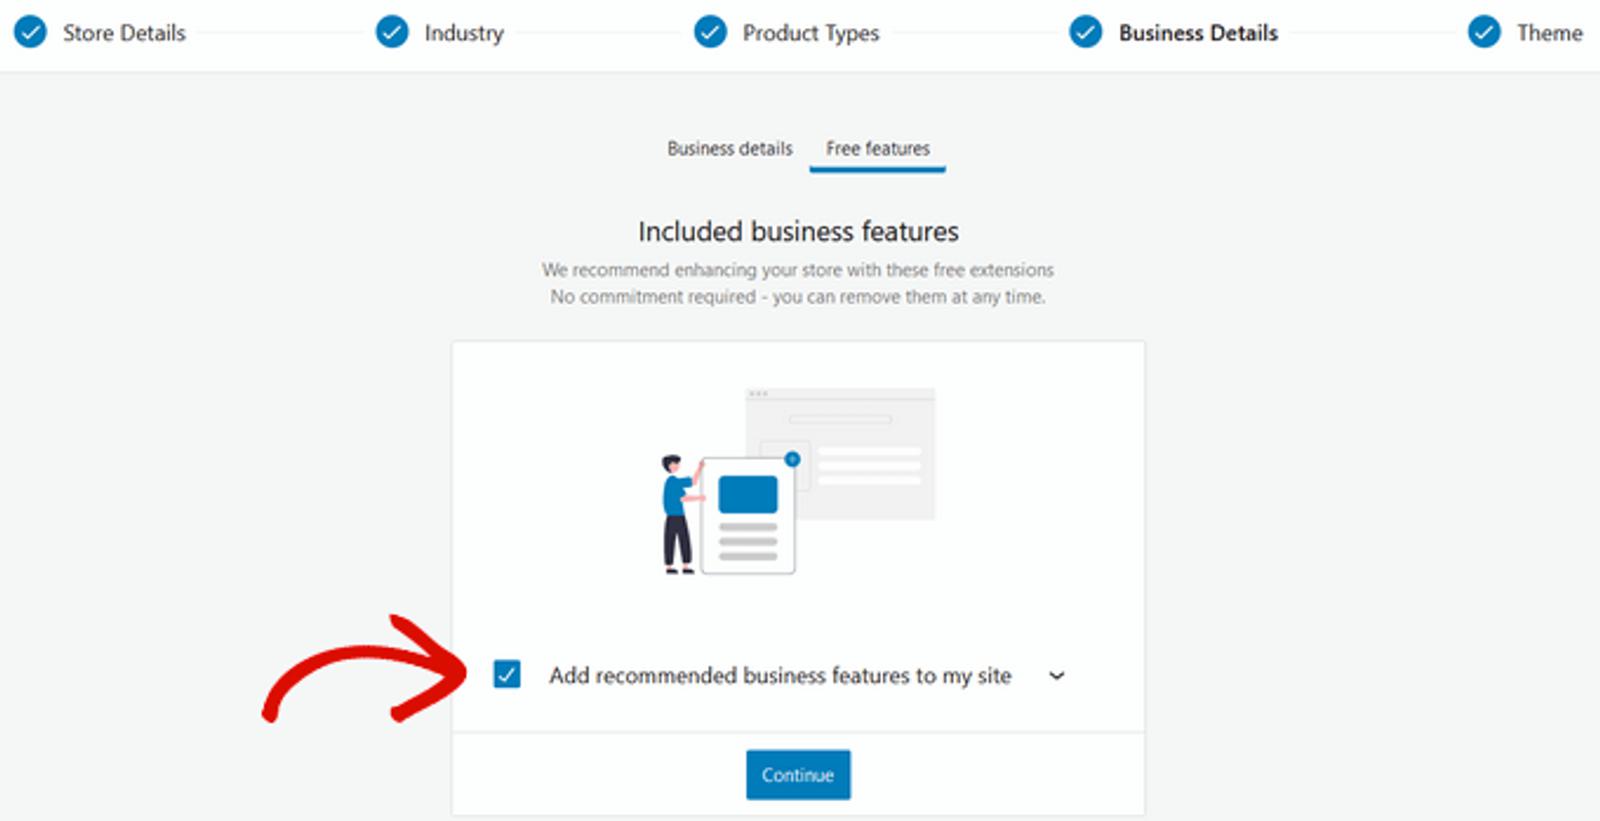
As you near the end of setup, you'll be asked if you want to add recommended business features to your site. This is free and you can see more details about them if you click the drop-down arrow. Click the Continue button once you decide.
Lastly, you'll be given the option to select a new WordPress theme for your e-commerce store or stick with the theme you currently have active. If you're setting up your site and store for the first time, you'll make these decisions now. If you already have a theme unique to your brand, it's best that you continue with that theme so the look of your site is consistent.
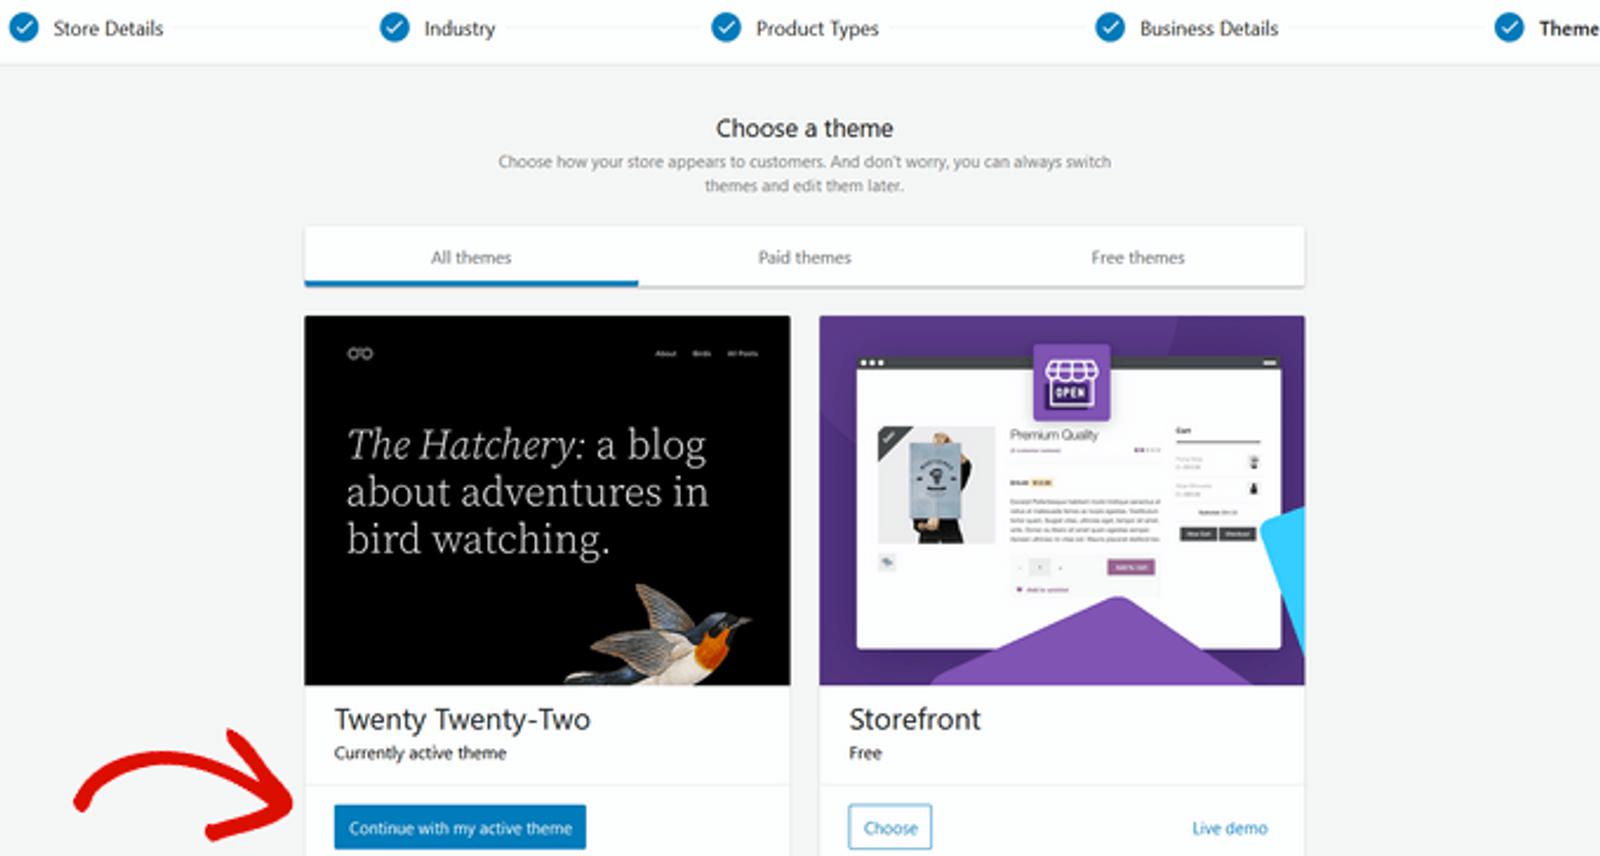
Note: You can always change themes later.
Click the Continue with my active theme button, and the WooCommerce setup wizard will take a moment to save your settings before being redirected to the WooCommerce dashboard. This is where you'll finish setting up your new online store.
How to set up a WooCommerce store
Now, when you navigate to your WooCommerce dashboard, you'll see a list of things you need to finalize before you can start selling on WordPress.
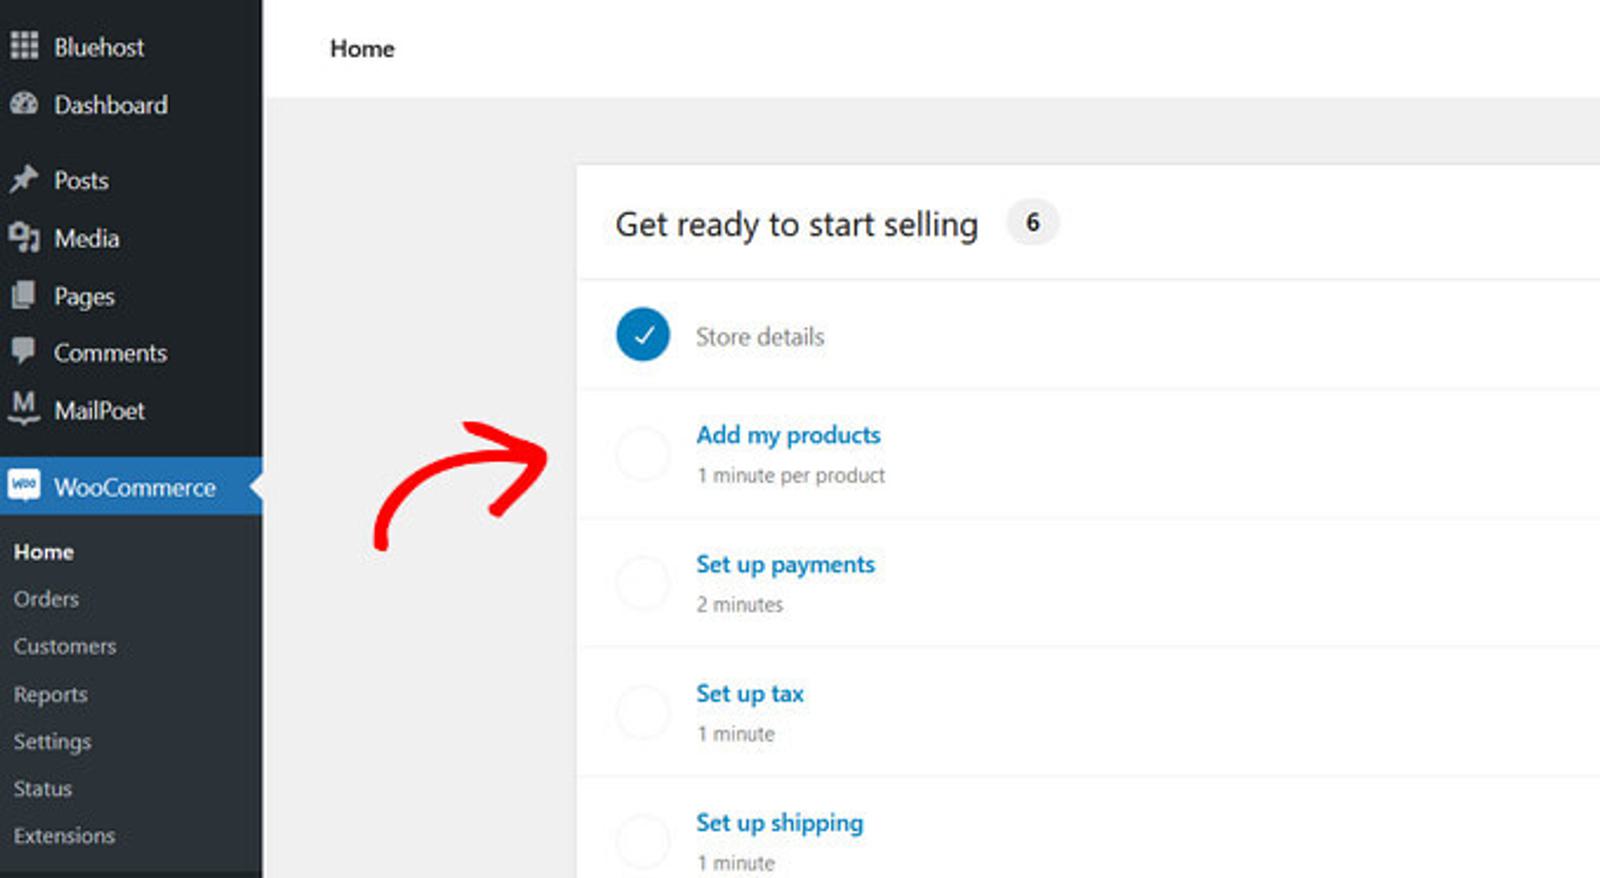
Each task will show you an estimate of the time it'll take you to complete. Select the Add my products task to begin.
How to add products in WooCommerce
Luckily, WooCommerce makes adding products to your online store very easy. You can add your products manually, using a template, imported via CSV, or imported from another service. For this example, we'll choose the template (which is also recommended by WooCommerce).
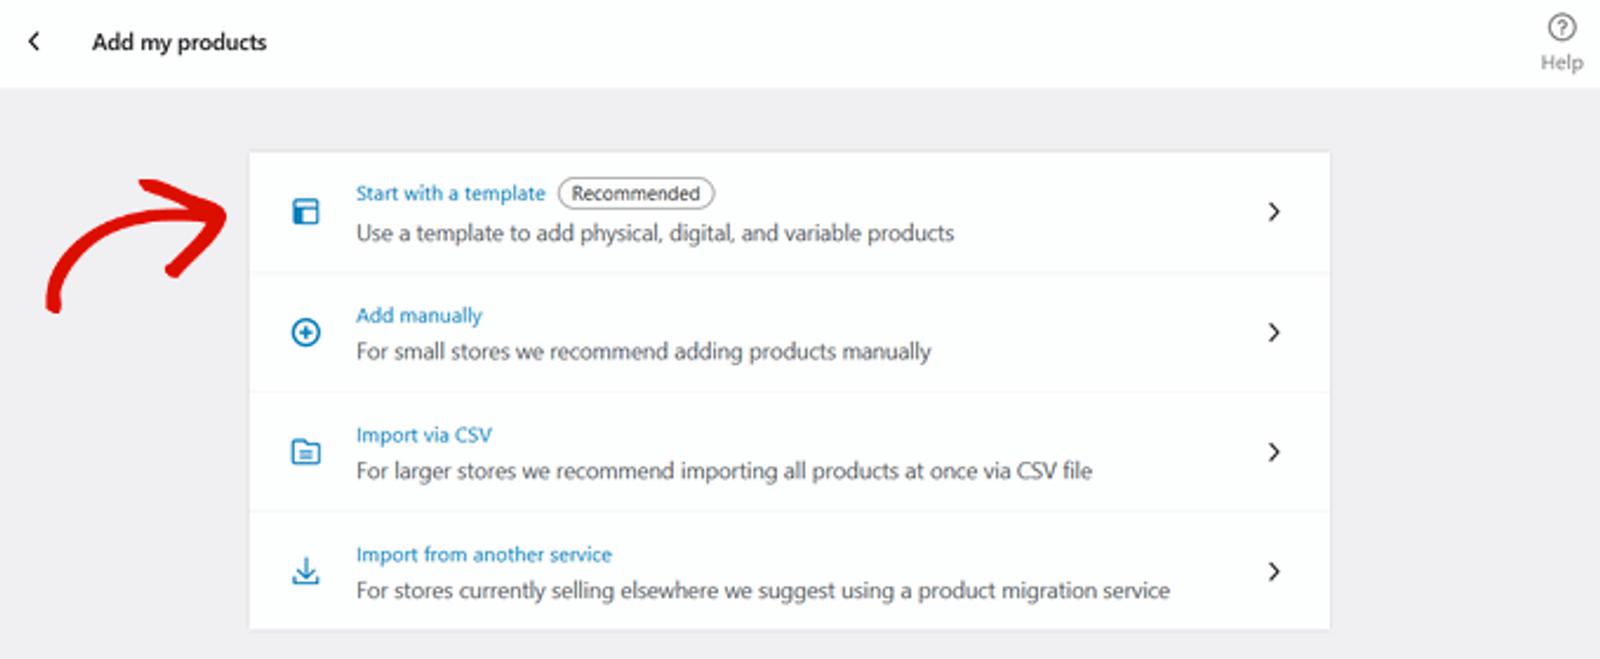
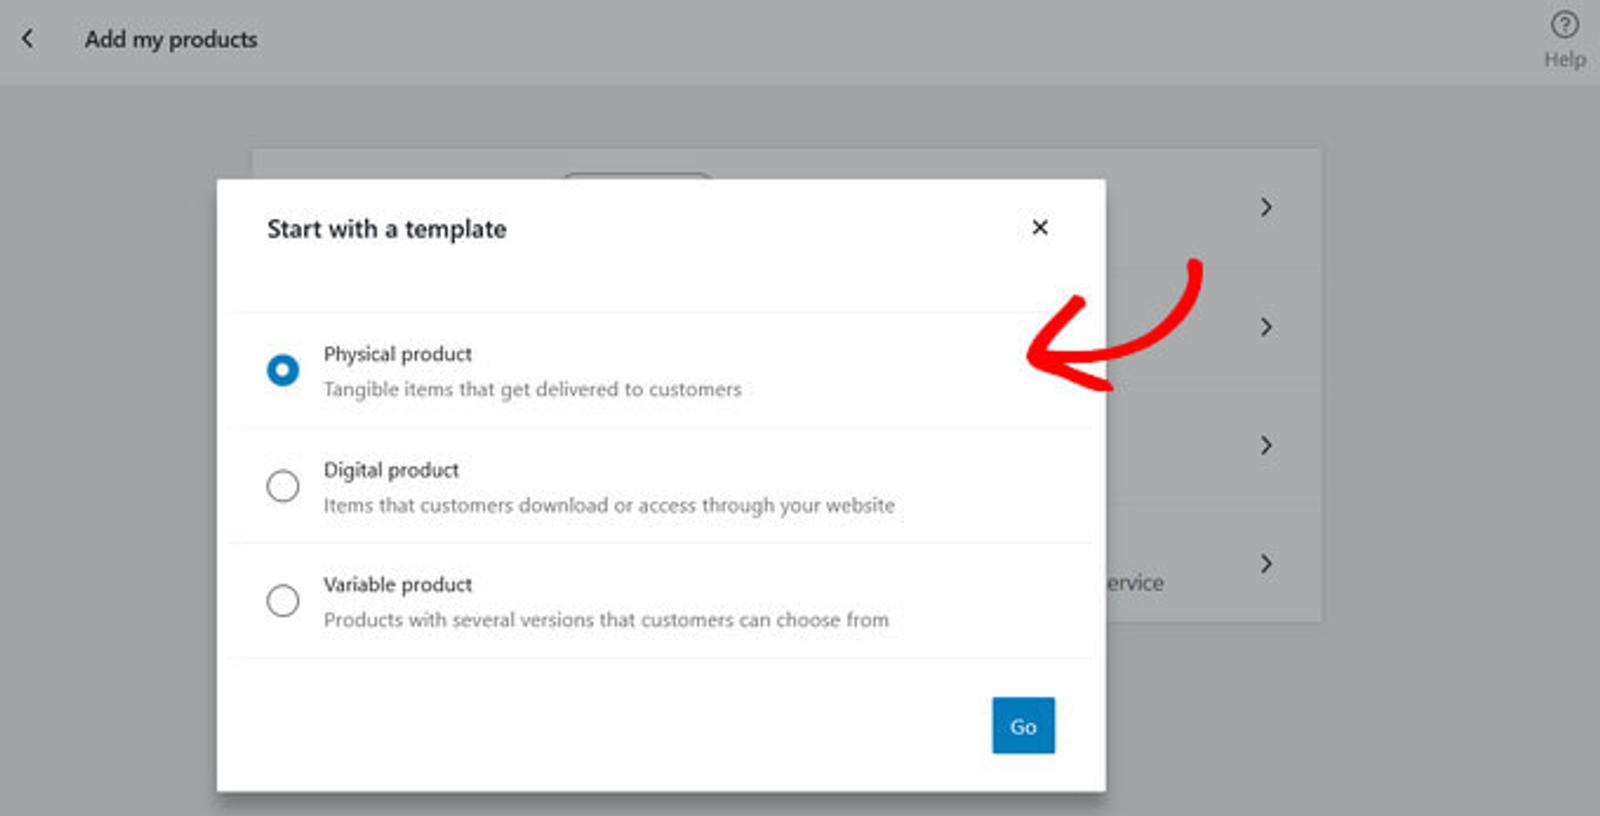
When you click the template option, you'll be prompted to select a template for a physical product, digital product, or variable product.
Note: You can also add products by going to your WordPress dashboard, clicking Products, and then Add New.
Select your choice, click Go, and you'll be directed to the product editor inside WordPress.
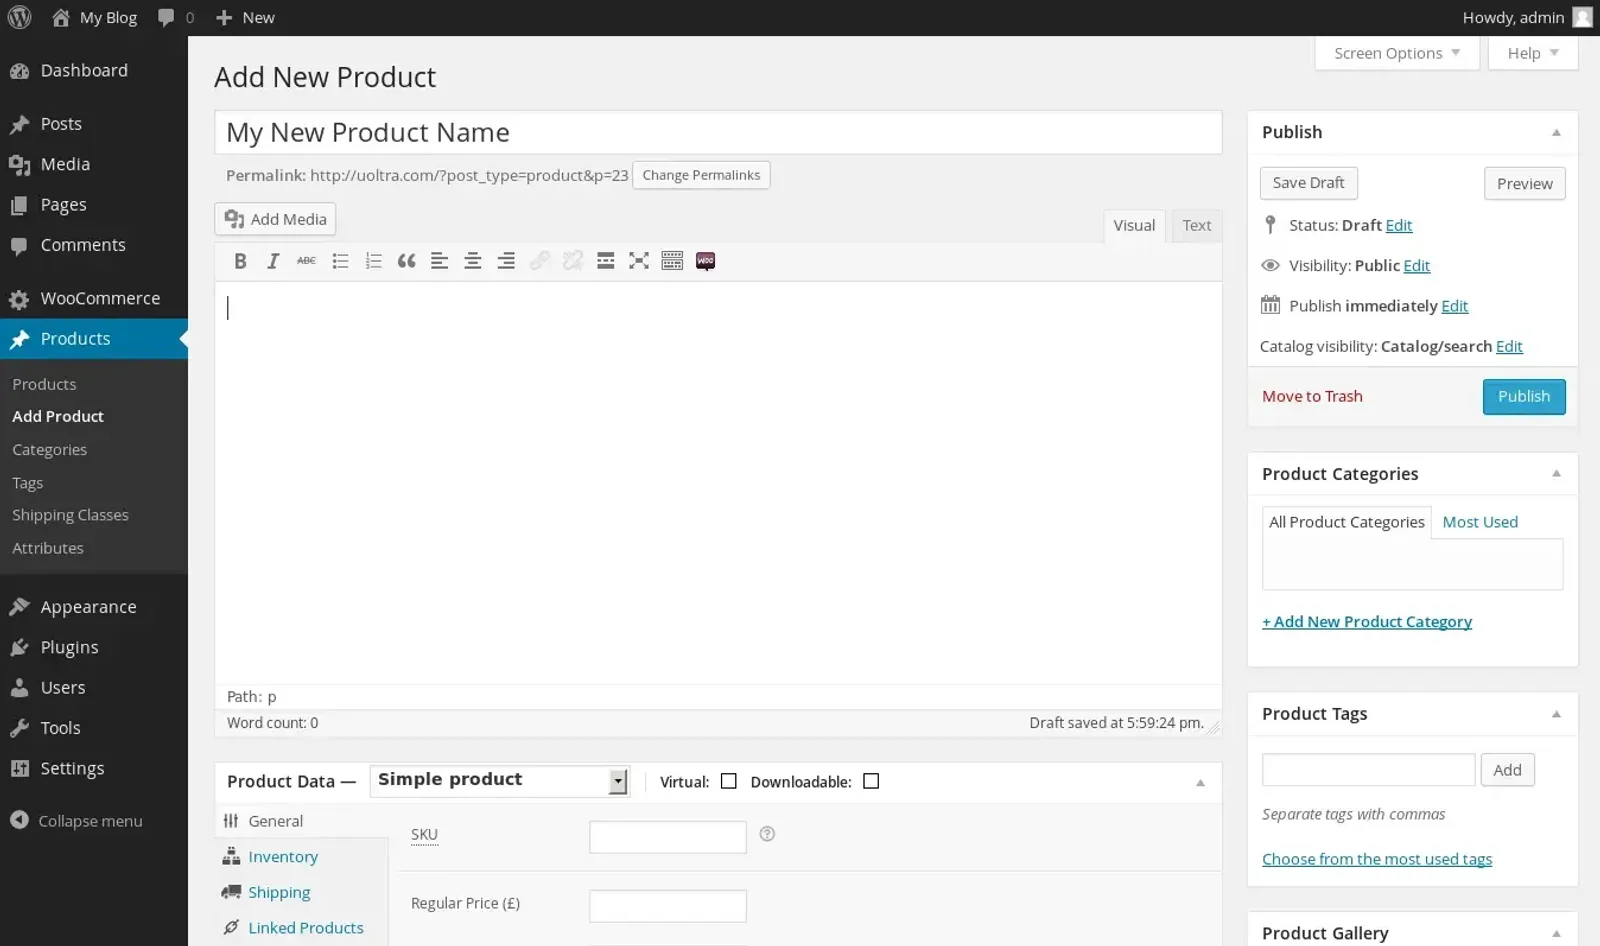
Enter a name and description for your product. The more detailed you are, the better! Once you have completed this, click Add New Product Category in the right sidebar.
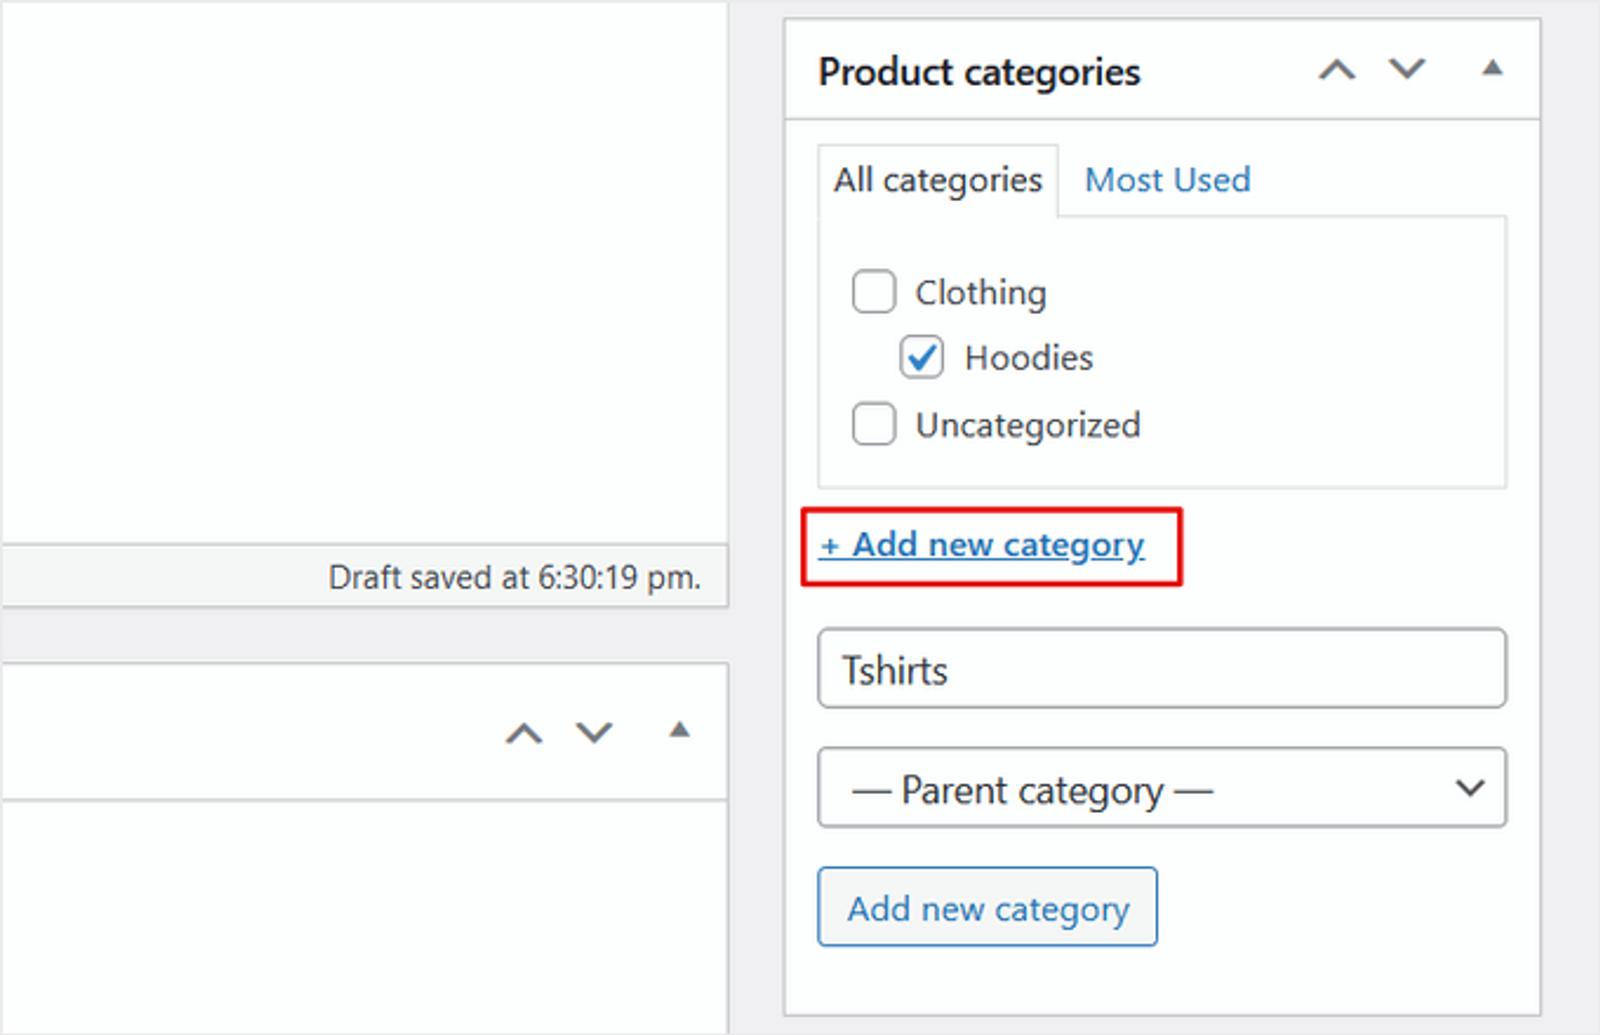
A product category will categorize (who knew?!) the products you list so customers can easily navigate and browse around your store. Next, go down to the Product Data box and select the product type, pricing, shipping costs, and other important information.
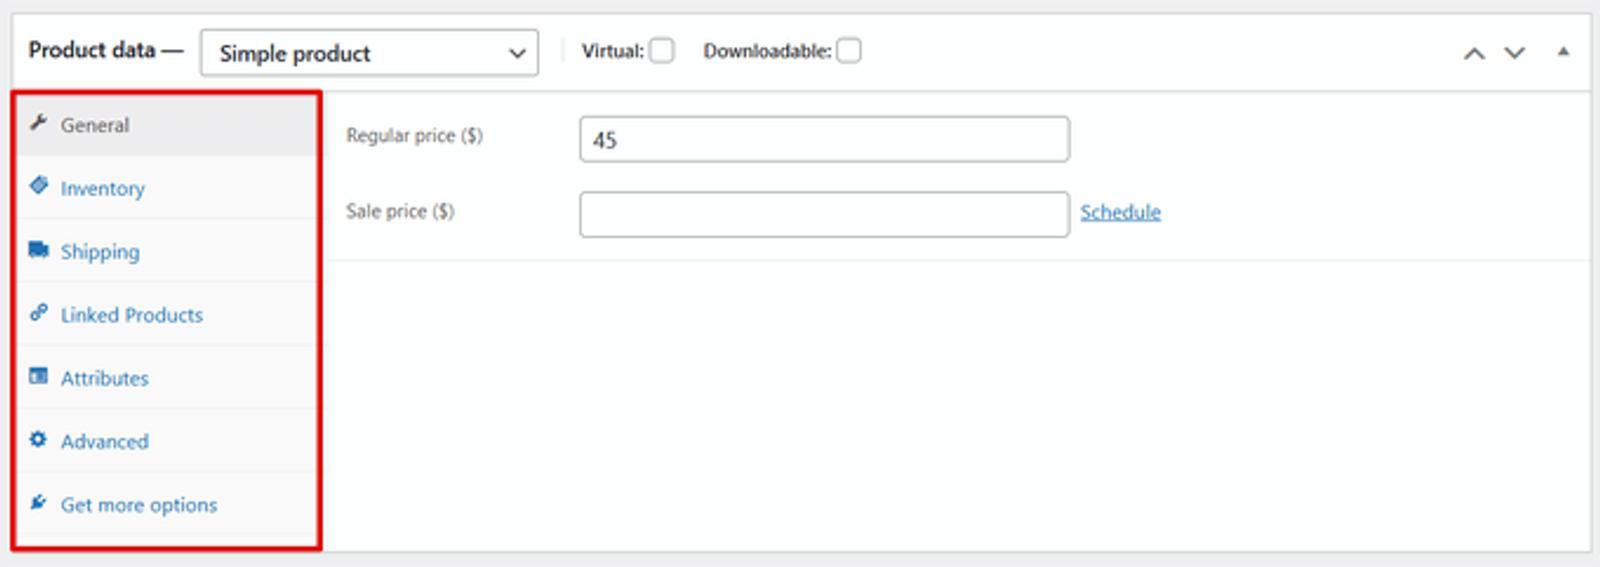
Tip: Once you've added all of your products, come back and edit the Linked Products tab. This section allows you to add related products to the customer, making it a perfect built-in tool to upsell and cross-sell your products. Just search for a product you've listed and select it from the drop-down menu.
Once this is complete, you'll see a product description box. This text will be displayed on the product pages on your site.
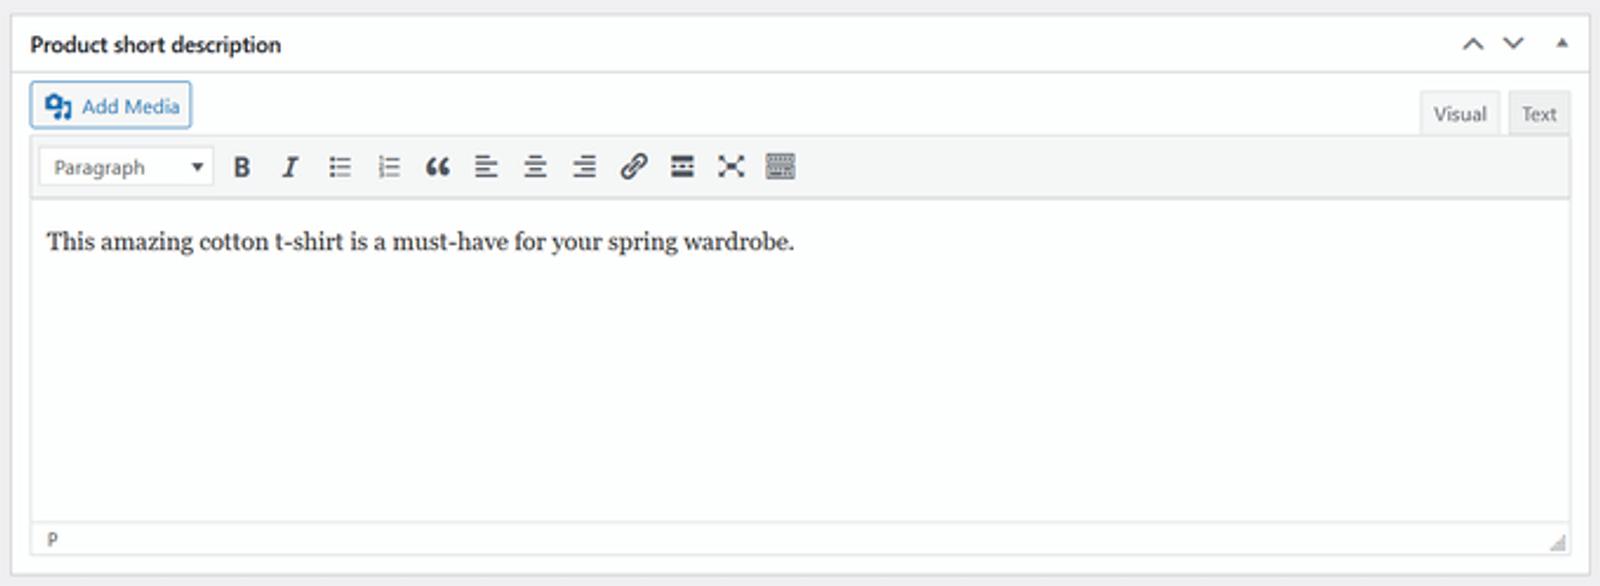
It's the perfect opportunity to be creative with your copywriting, adding a catchy hook to catch the customer's attention and drive more clicks. It's time to upload some photos of your product! Upload the main product image (the one that best showcases your product since it'll be the image used on the product page).
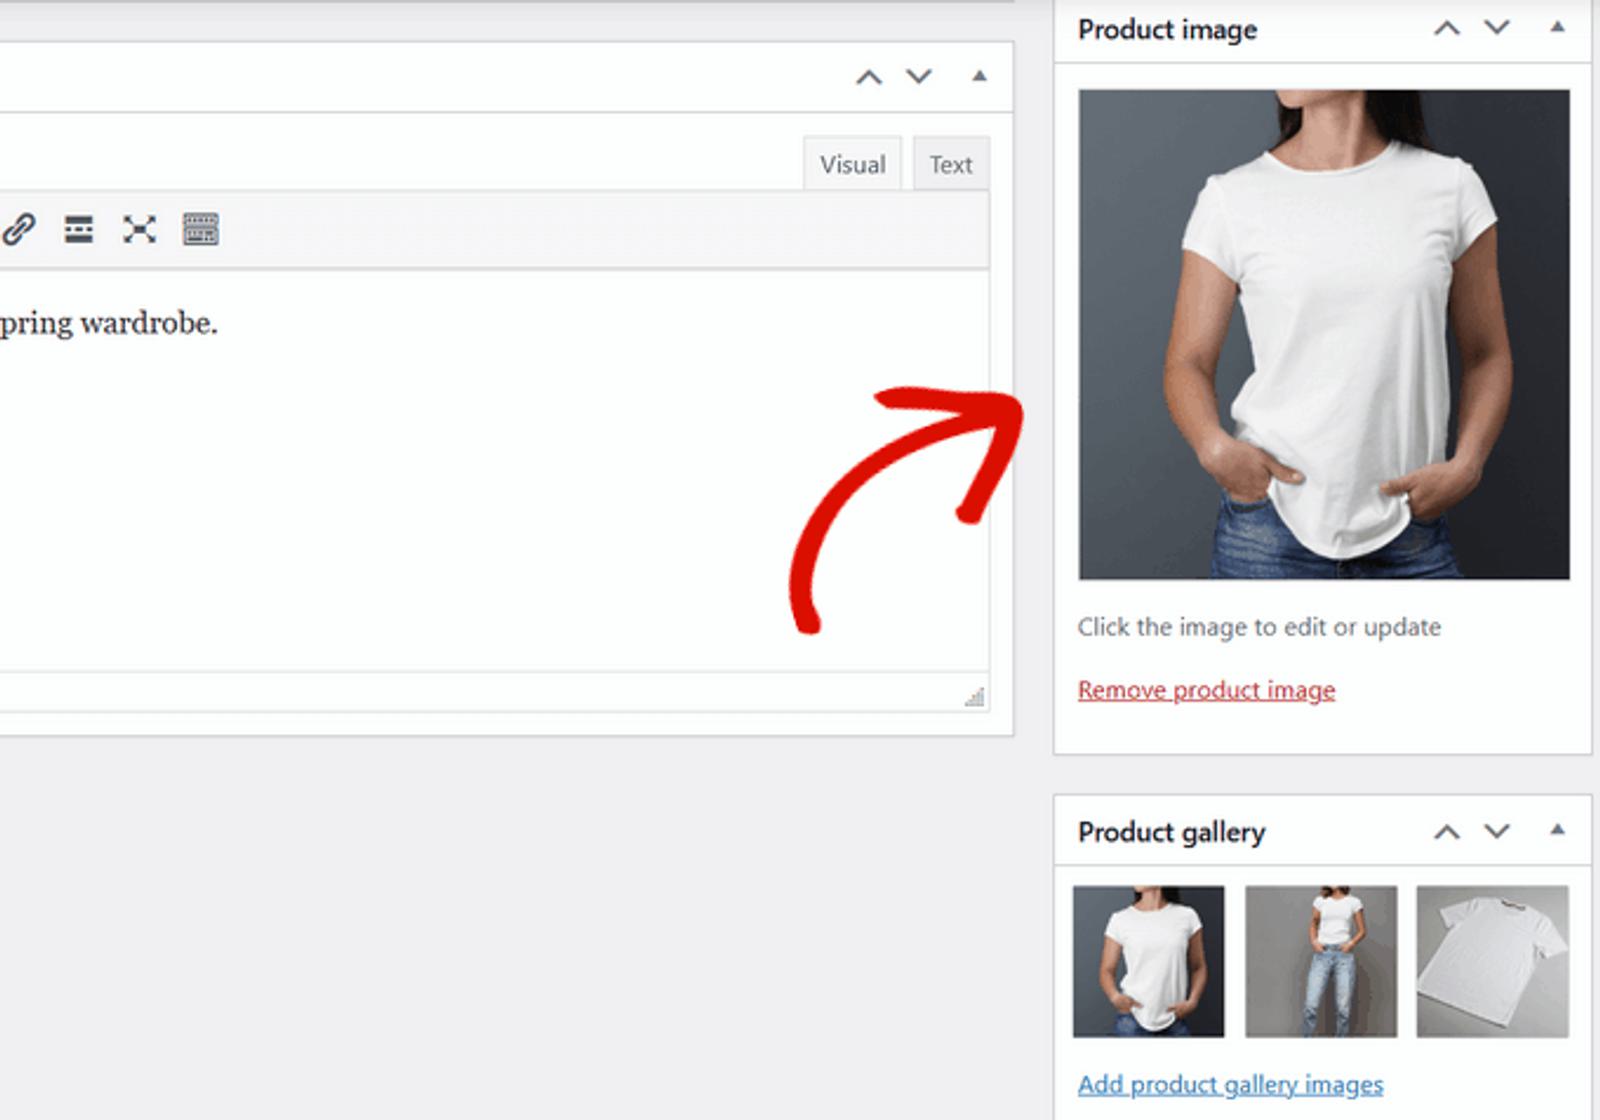
You probably want to upload a few photos to show off the product from different angles and how it's used. To create a product gallery, simply click Add product gallery images.
You've completed all the steps to list a product on your store! Click the Publish button to finalize and push your product live.
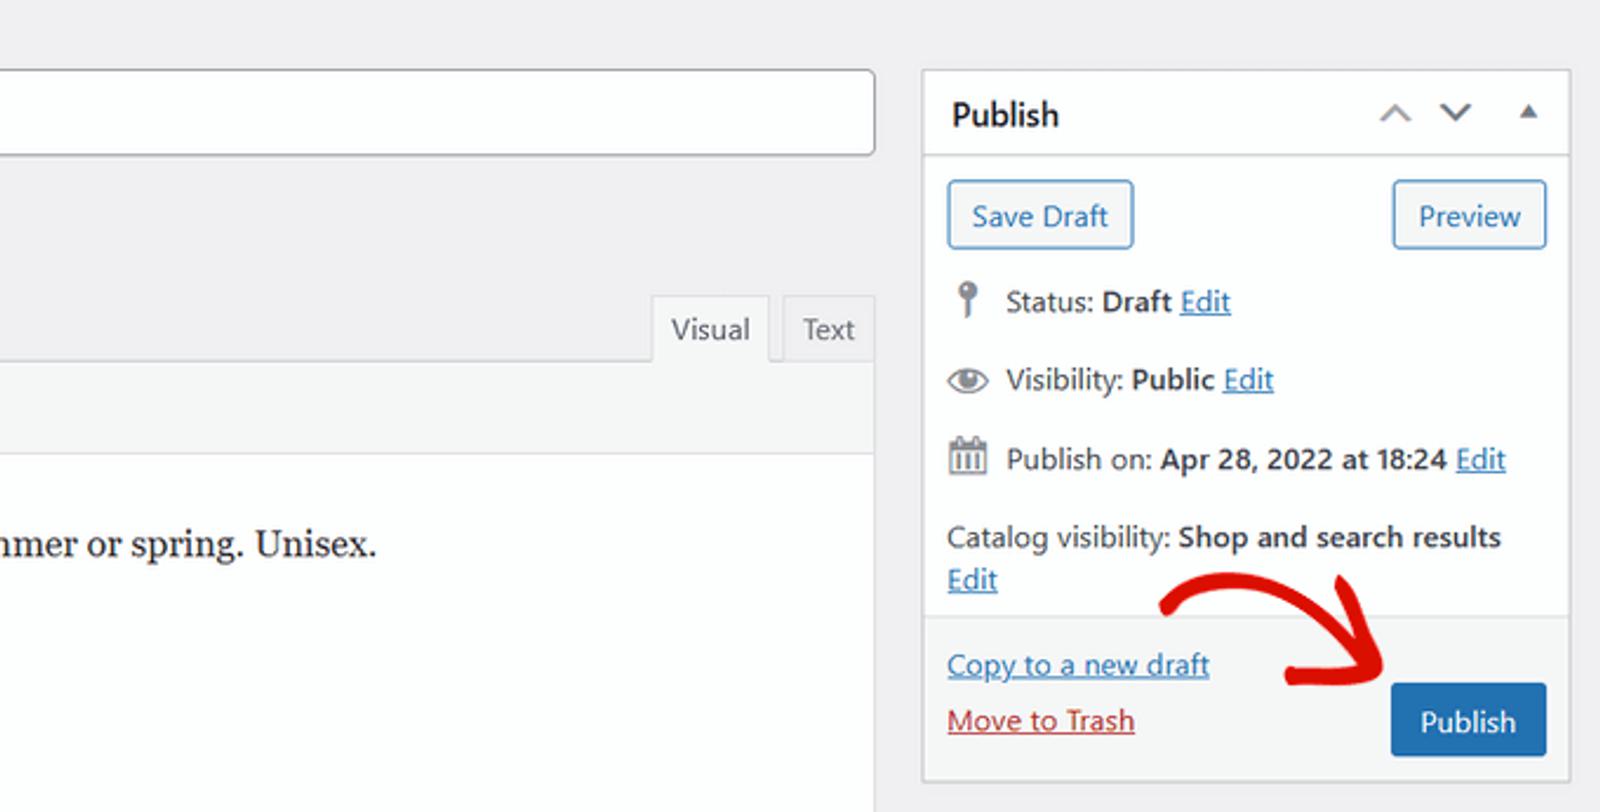
To add more products, repeat this process until you've added everything you want to list. We've completed two out of five steps to fully complete your new online storefront.
How to set up payments in WooCommerce
Now, go back to the WooCommerce homepage to continue with the task checklist. Click Set up payments.
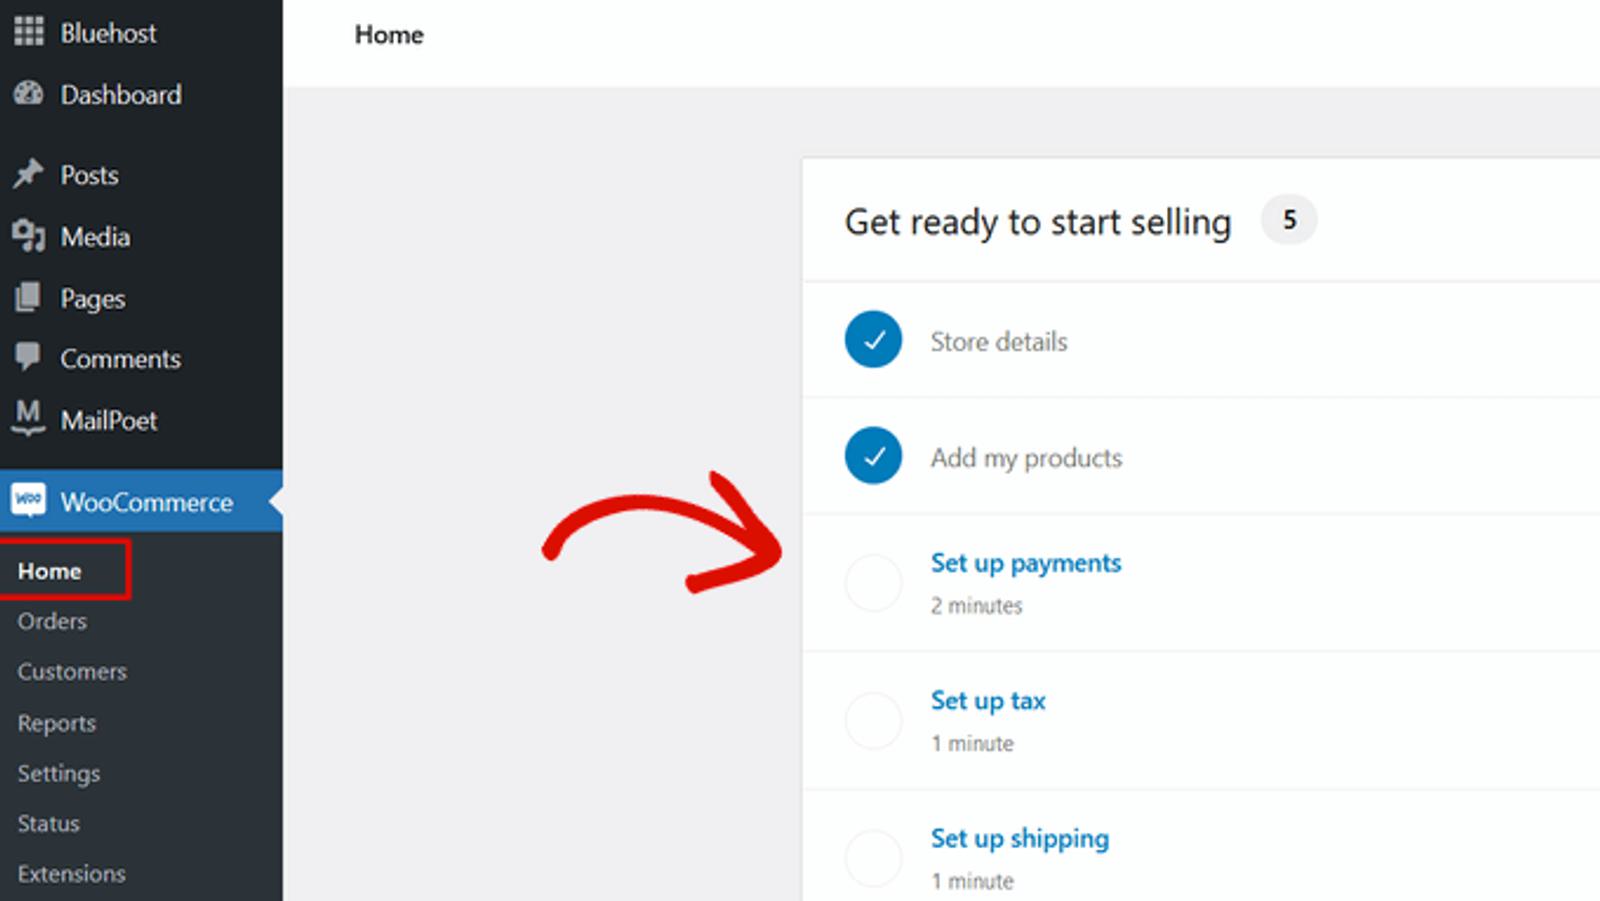
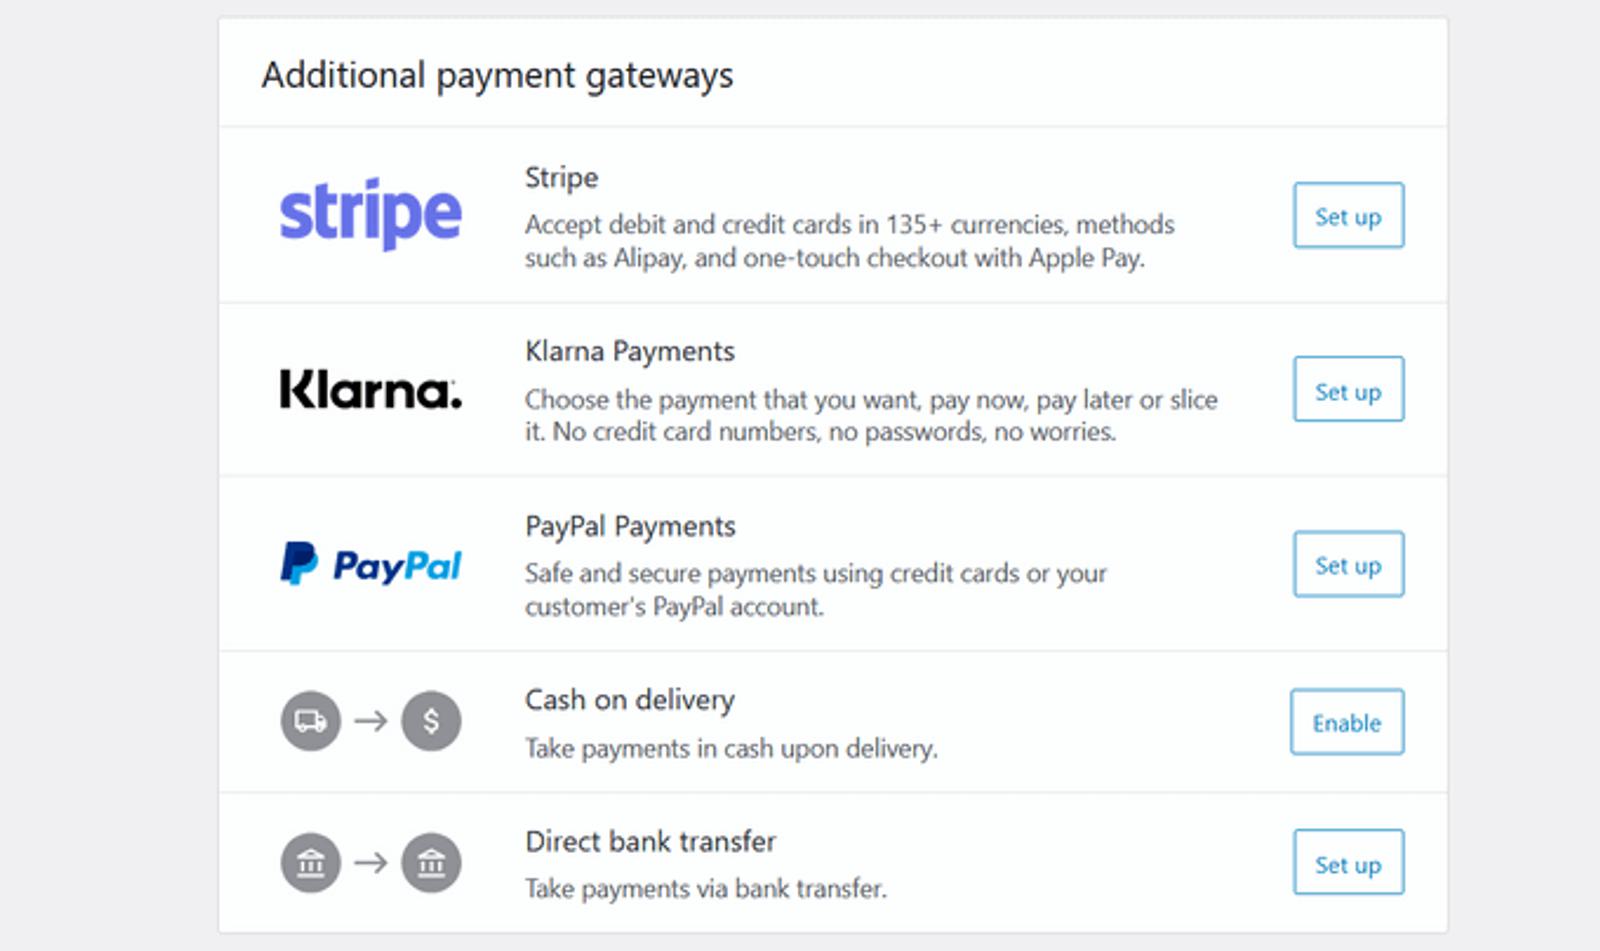
This will take you to a page that lists payment gateways you can connect to. The options are Stripe, Klarna, PayPal, cash on delivery, or direct bank transfer. Click Set up on the payment gateway of your choice.
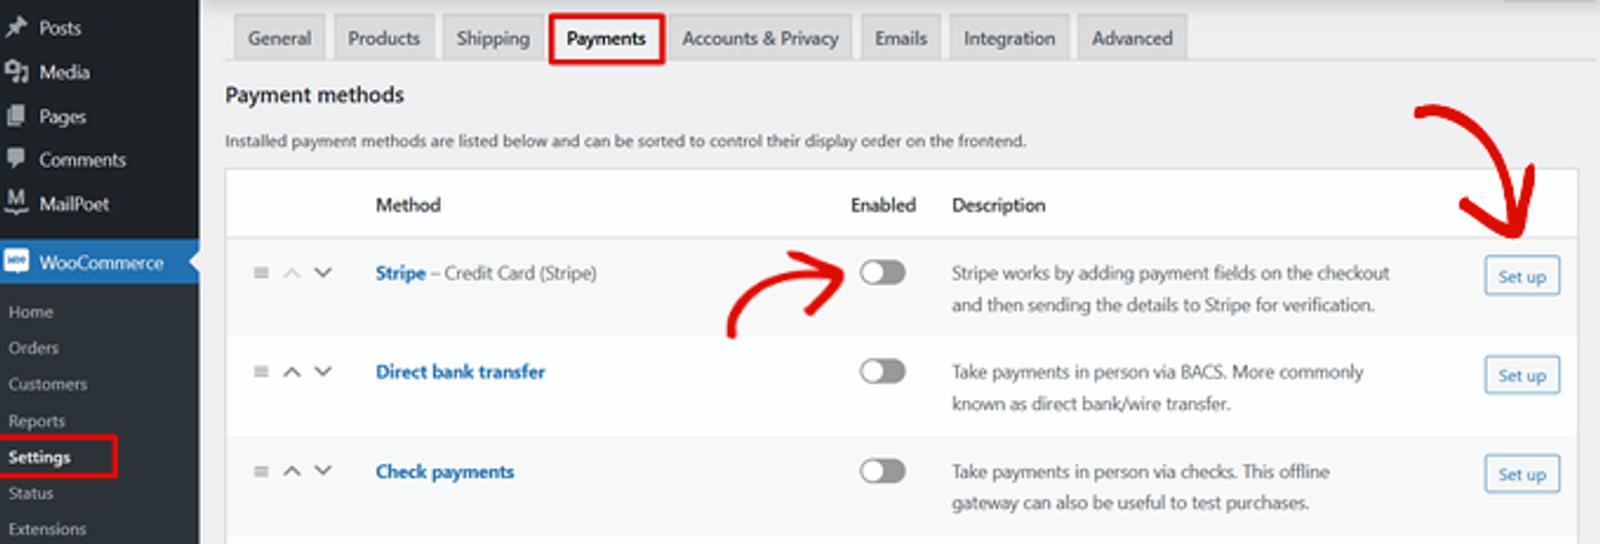
You can always add a new payment gateway in the future. Just go to WooCommerce, Settings, and Payments.
Now that you've set up your preferred payment method(s), let's talk about everyone's favorite topic: taxes.
How to set up taxes in WooCommerce
The next step on the WooCommerce setup checklist is to set up taxes. It may sound daunting, but it's pretty easy. WooCommerce gives you the option to set up taxes with Avalara, WooCommerce Tax, or manually. You can also choose not to charge sales tax if you don't add taxes to your products (or build them into the listing price).
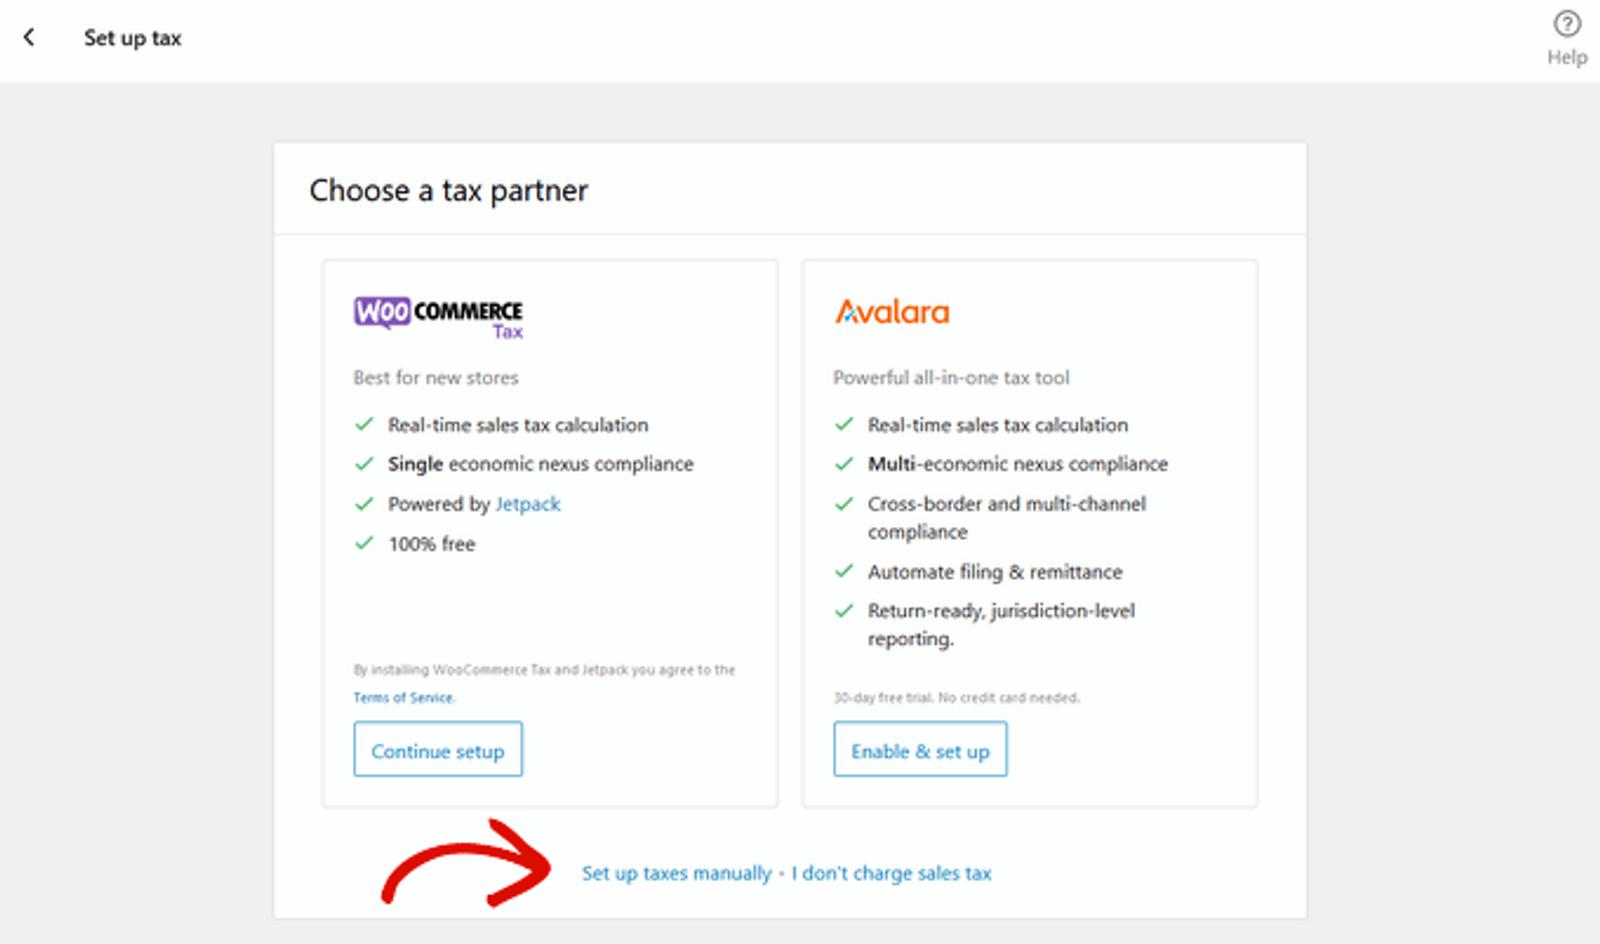
Let's select the manual option. When you click Set up taxes manually, you'll be taken to the Tax tab in your WooCommerce dashboard.
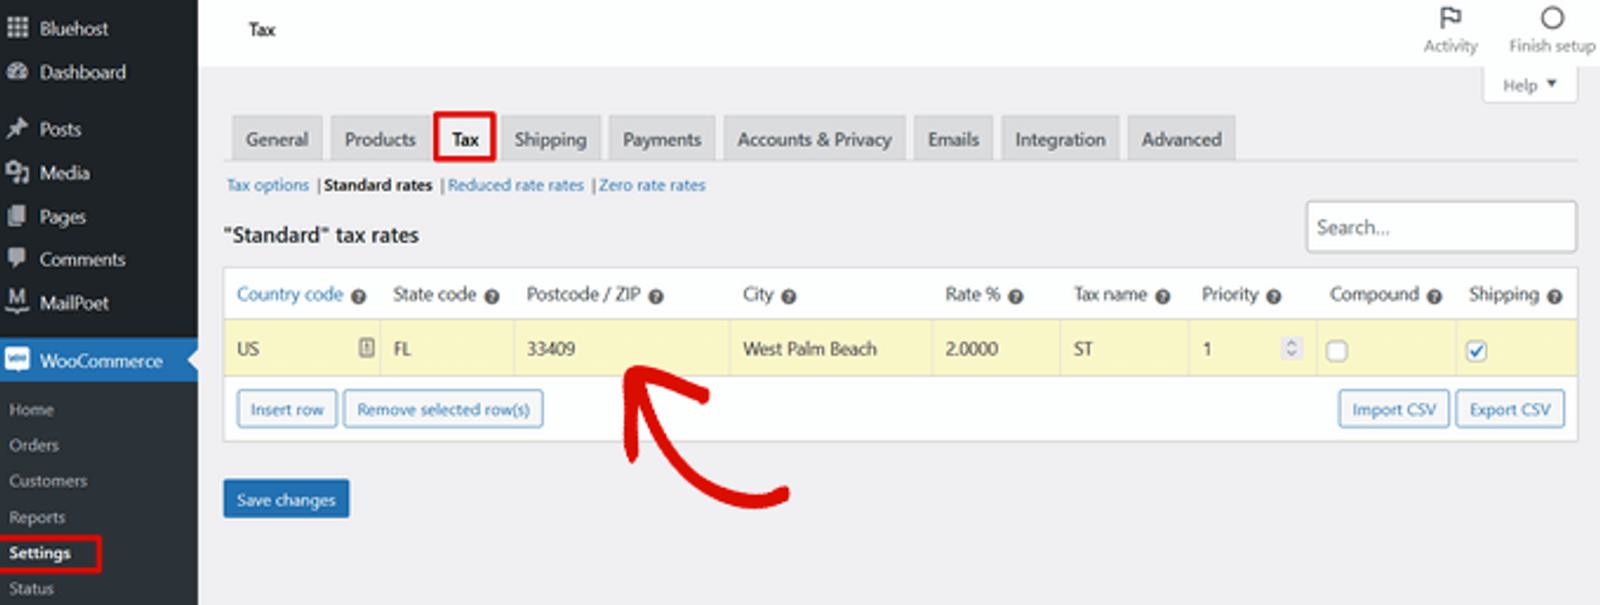
To complete this step, add tax information like your country, state, zip code, city, tax rate, tax name, priority, and shipping cost. If you need additional help, there is always the Help tab at the top right to assist you.
When you're done entering this information, click Save changes.
How to set up shipping in WooCommerce
Navigate back to the WooCommerce setup checklist and click the Set up shipping task. You'll be taken to a new page where you can enter the shipping costs for your country. You can also leave it at zero if you offer free shipping on your products.
If you want to ship globally, click the toggle for Rest of the world and enter the shipping cost for different countries outside your own.
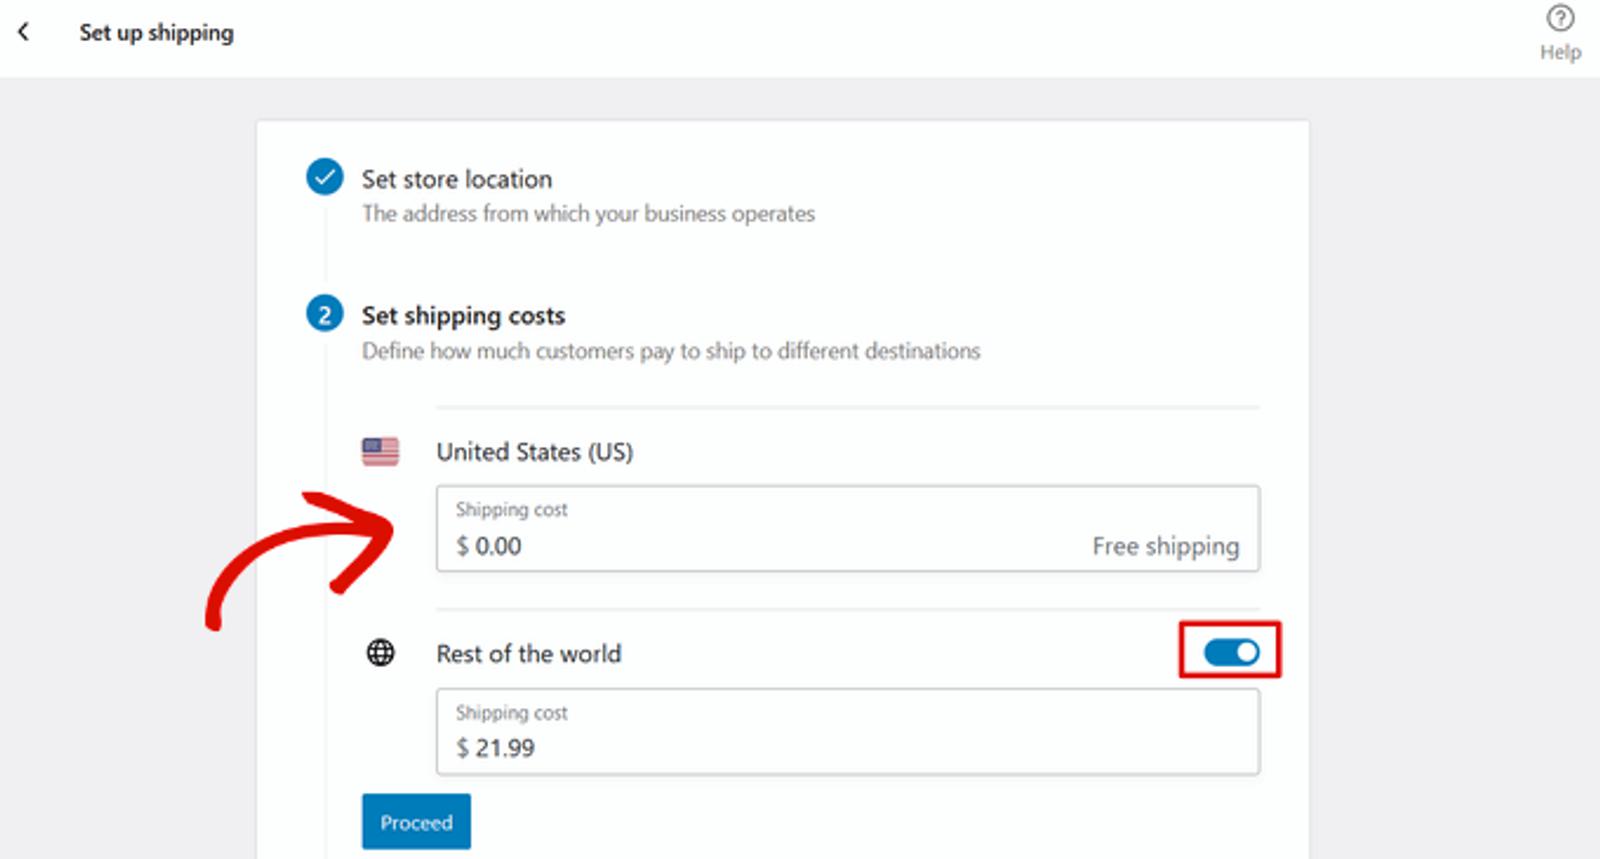
Once these prices are entered, click Proceed. You'll be prompted to install and enable WooCommerce Shipping so you can save time by printing your USPS and DHL Express shipping labels at home. If you don't want to enable this, click No thanks.
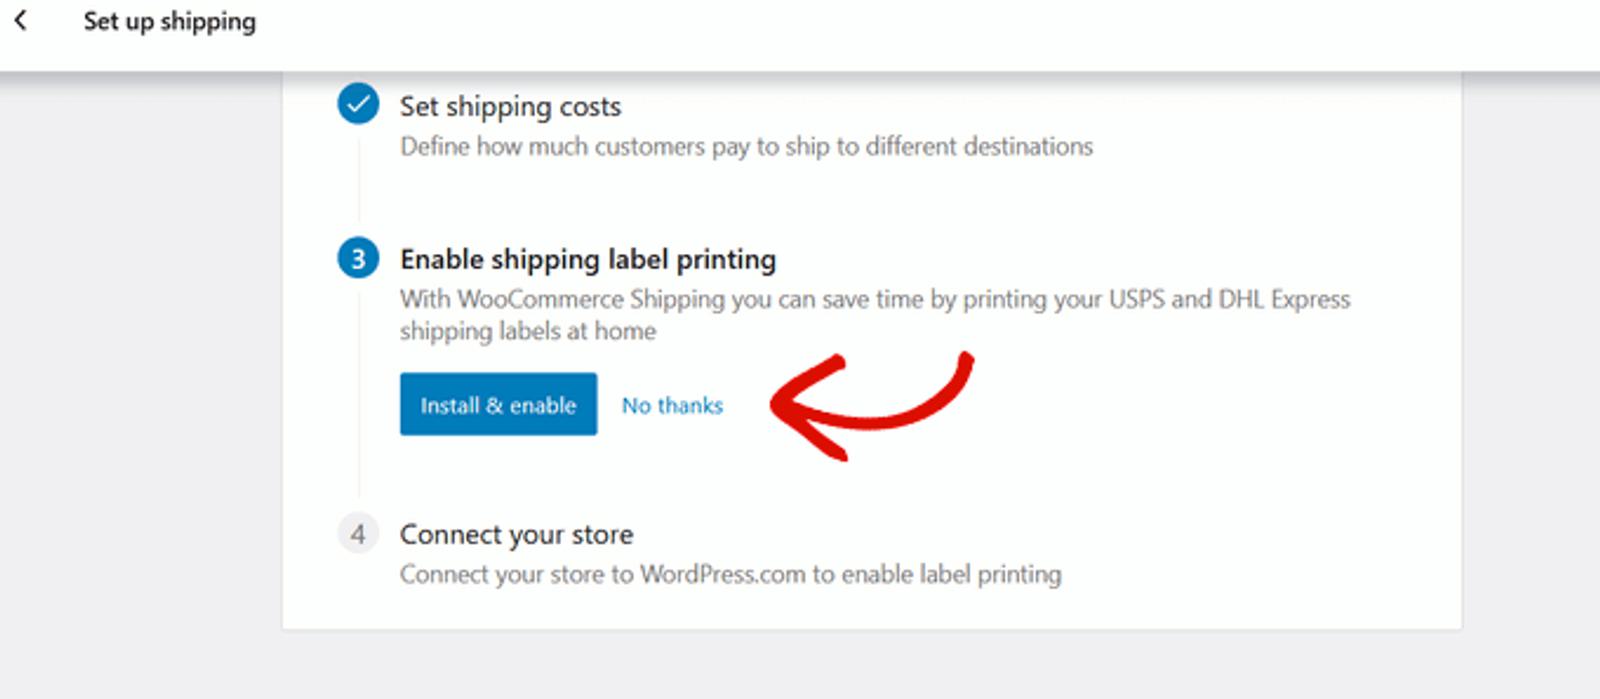
Finally, you'll connect your store to your WordPress.com so you can enable label printing for all of your products (if you've opted to install and enable WooCommerce Shipping).
You're done!
If you'd like a few more resources on setting up and customizing your WordPress site, we'll list a few below that will help you understand your site visitors on a much deeper level and provide tips on growing your email list on WordPress (a tactic you shouldn't overlook).
The best email marketing platforms for WooCommerce
Here's the truth. Although WooCommerce provides built-in features that send emails to users who take specific actions on your store, these email features are pretty bare bones. You may miss out on more sales if you don't invest in an email marketing solution to properly build long-lasting customer relationships.
Collecting email addresses isn’t just about quantity; it’s about quality. You need potential customers, not just random contacts. For WordPress users, the platform offers versatile tools and plugins designed to streamline this process. From simple to sophisticated strategies, WordPress can be your ally in building an email list that not only grows but actively boosts your engagement and conversion rates.
Did you know that 90% of people who visit your online store will leave without buying anything? This is precisely why it is important for e-commerce businesses to take the time to build their email lists (and nurture those contacts).
Here's some good news. WooCommerce integrates with all major email marketing services. Let's take a look at why ActiveCampaign is a standout when you want to open a direct line of communication with your customers.
ActiveCampaign and WooCommerce
When you integrate WooCommerce with ActiveCampaign, you can engage with your customers throughout their entire purchasing journey. What do we mean by this?
• Acquire new customers: Streamline the process of reaching and engaging with potential customers with dynamic content, making it an invaluable tool for acquiring new customers and growing your business.
• Re-engage your existing customers: Send reminders for abandoned carts, personalized recommendations, event-triggered messages, feedback requests, and win-back campaigns to foster customer retention.
• Drive revenue: Deliver personalized and timely messages that resonate with your audience, showcasing products they genuinely desire, thus driving sales and enhancing overall customer satisfaction.
• Optimize subscription business: ActiveCampaign’s Recurring Payments automations help manage personalized communications and address customer needs to increase customer lifetime value, drive average order value, and reduce churn.
To fully integrate, you'll need to install the ActiveCampaign plugin for WordPress as well as the WooCommerce integration within ActiveCampaign.. This is an additional step but one worth taking since you'll have access to the full suite of marketing features, including advanced marketing automation, campaigns, landing pages, forms, contact segmentation, and site tracking.

ActiveCampaign shines with email marketing automation. You can automate your emails based on custom triggers, actions, and conditions, giving you the power to stick close to your customers as they engage with your site. Use this data to send customized follow-up emails to your contacts, trigger automations, create list segments, configure automation goals, and more.
WordPress and WooCommerce: a dream come true
We hope this article helped you set up your WooCommerce store in WordPress and also gave you some food for thought about email marketing tools. Marketing your brand, site, and products is an always-changing journey, so it's important to always educate yourself on how and when customers want to interact with you.
If you've stuck around this long, look forward to more content about WooCommerce. This article is part of our WooCommerce series that covers WooCommerce plugins, integrations, and software you can leverage to transform your WordPress site into a powerful e-commerce store.
Sign up for a free trial of ActiveCampaign to see the benefits of investing in email marketing.
Next read in the series:
WooCommerce of Shopify: Which is Better in 2024?

