The more intentional you are with your marketing the more you accomplish.
Marketing is more than doing random actions and hoping for the best. The effectiveness of your marketing is determined by the level of intentionality you execute it with.
Such intentionality can be summed up by always beginning with the end in mind.
First, ask yourself, “What am I trying to achieve with my marketing?” Then plan and build from there.
That goal-driven approach does nothing but enhance your marketing efforts and make it easier to determine what’s working and what is not.
What are Goals?
Goals are an action you can add to your automations. They are a way of measuring the effectiveness of your marketing. Used properly, goals provide an accurate snapshot of how a specific part of your marketing (or your marketing as a whole) is performing.
That is why it’s critical to start automations by recalling your ultimate marketing goals. Doing so ensures that your automations are aligned with your end goal(s). In addition, by clarifying what you want contacts to do, you can make more informed adjustments if goals aren’t achieved.
But that’s not all.
You can use multiple goals to measure milestones and key events. Ideally, you want all of your goals working together to achieve your desired outcome. That might look something like this:
- Goal 1: Download a whitepaper
- Goal 2: Schedule product demo
- Goal 3: Buy product
If contacts achieve the first goal, you know they are on track to achieve the second goal. If they meet the conditions of Goal #2, you know they are in a position to achieve your main goal: buy your product.
For every main goal, you can set up unlimited preliminary goals. In fact, we recommend you err on the side of having too many goals. Deleting data points is easier than adding them after you activate your automations.
How Do Goals Work?
The primary function of goals is to help you easily measure the effectiveness of your marketing. However, goals serve a secondary function when it comes to automation: auto-progression.
Auto-progression is the ability to automatically push contacts past steps in the automation that — because the contact meets certain conditions — are not relevant to that contact. For instance, let’s say you intend to send new leads two follow-up emails, with the goal to produce more product demos. A contact might schedule a demo earlier in the automation than you anticipate. Since the contact already achieved your goal, there’s no longer any need for them to receive the follow-up emails.
The goal: Schedule a demo
The actions bypassed: Any of the two emails the contact was queued to receive
In other words, you can use goals to automatically nudge goal-fulfilling contacts through the automation and proactively manage the messages those contacts receive. In the above scenario, the contact skips over those follow-up messages once they schedule a demo and move directly to the automation’s next step.
It’s like going to a nightclub and being on the VIP list. When a contact’s name is on the list, they skip the line and enter the club.
Such functionality epitomizes how ActiveCampaign allows you to truly personalize interactions with your leads and customers. You can determine the volume of content customers are exposed to based on their individual behavior.
And remember, behavior-based marketing is one of the most powerful tools your business can deploy.
Using Goals in ActiveCampaign
The first thing you’ll notice about goals in ActiveCampaign is that they indeed measure performance and enable auto-progression. In the Automation Stats to the right your automation, you can see how many goals it contains, and click on an individual goal to view its completion rate.
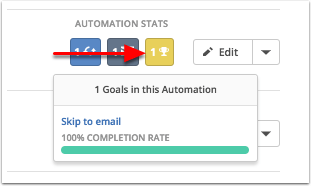
A goal’s completion rate is represented by a percentage and is the number of total contacts that enter the automation, divided by the number of contacts that achieve the goal.
How to Configure a Goal
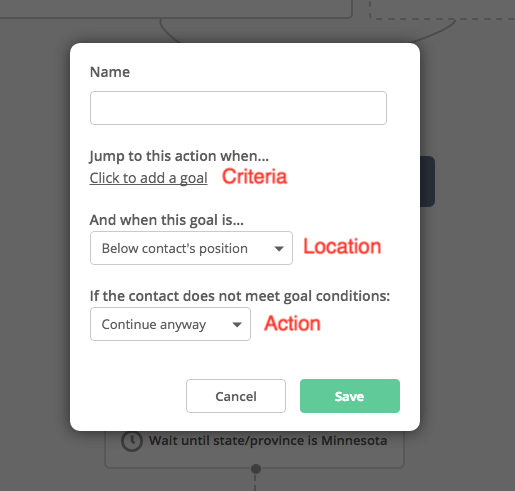
A goal consists of four elements: name, criteria, location, and action. Each is explained in detail below.
Name
As it sounds, the name is the label you create for your goal in the automation builder. The name you choose should describe the goal’s desired outcome. This will help you remember what your automation is designed to do, and empower you to use goals to trigger automations, adjust contact and deal scores, and create segments.
Criteria
The criteria determine the nature of the goal. Use the segment builder to set the conditions you want contacts to meet. You can be ultra-specific in configuring your goal. In fact, our goal editor is just one tool that distinguishes ActiveCampaign in marketing automation. While other platforms are limited to purchase and tag-based goals, ActiveCampaign equips you with hundreds of conditions. Here are some examples:
- Visited a web page
- Opened an email
- Clicked a link
- Submitted a form
- Lives in a certain geographic region
- Custom field value changes
- Score range (such as when a contact reaches 100 in an engagement scoring system)
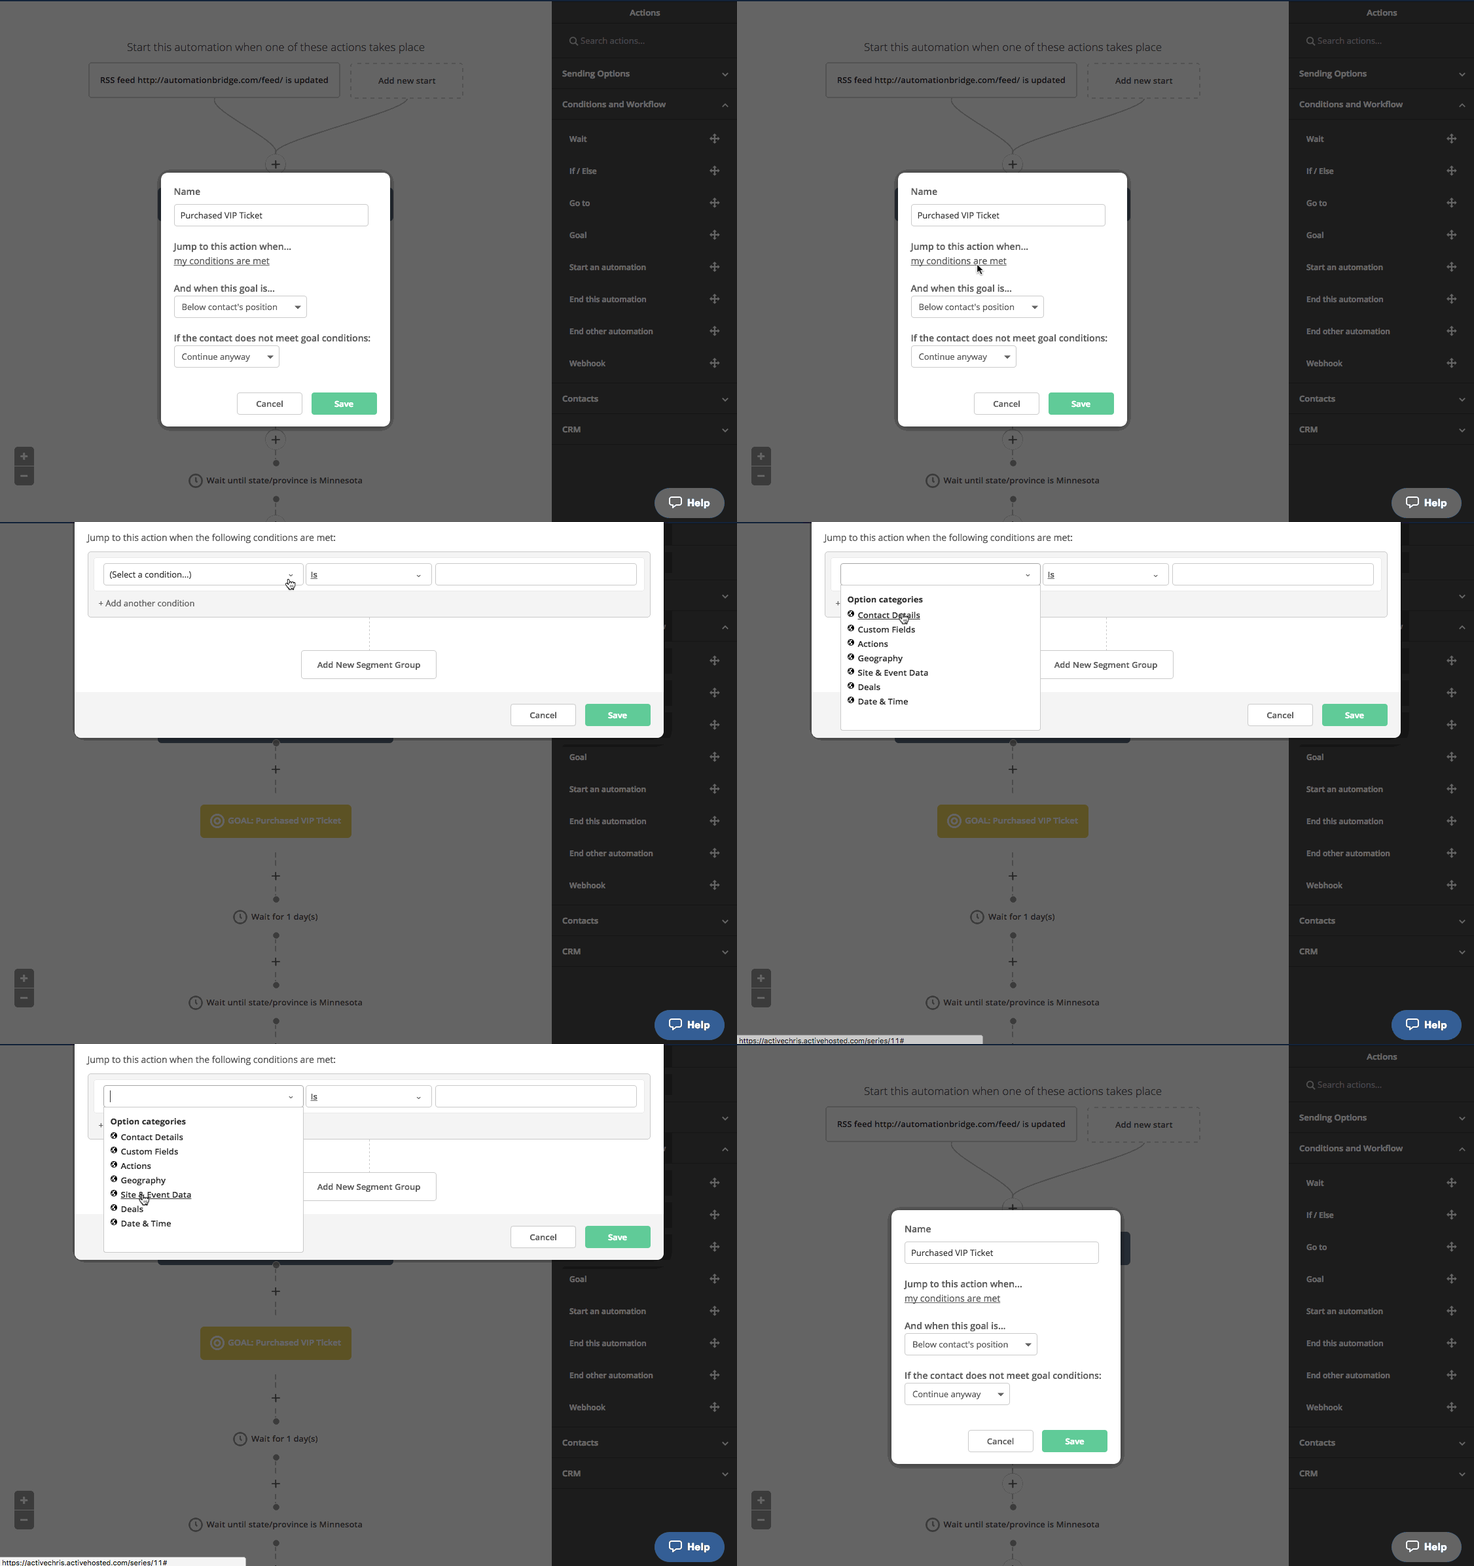
Additional flexibility exists in AND/OR logic, which allows you to configure goals with multiple conditions. For example, you can use AND/OR logic to set up the following goals:
- Visited my contact page AND lives in Illinois
- Filled out a form OR clicked a link in an email
- Has a custom field value AND has a tag named “Applicant”
Location
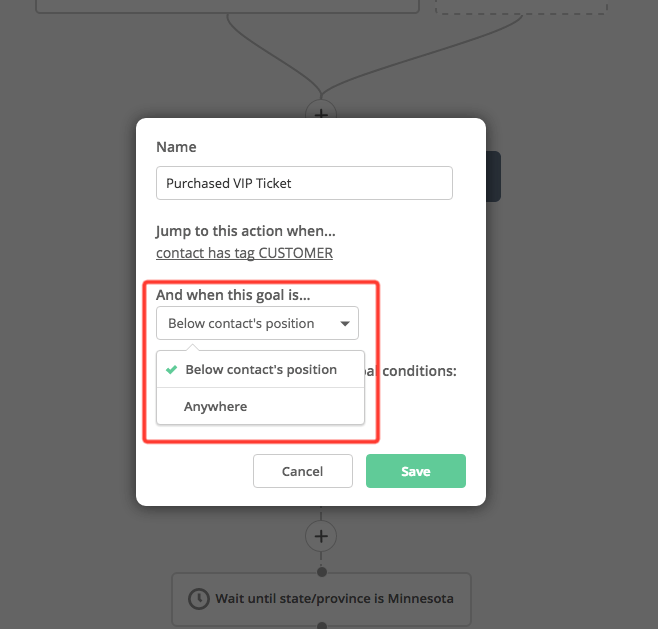
The location setting determines if contacts are eligible to achieve a goal, based on their current position in the automation. You can choose between:
- Below contact’s position: If you set the location to “Below contact’s position,” a contact can achieve that goal only if the goal is below their position in the automation. Once the contact is positioned below the goal, they can no longer achieve the goal, even if they meet the criteria. In other words, contacts can flow down and past goals, but never back up to them. You will most commonly use this configuration if your automation is very linear and does not use If/Else conditions.
- Anywhere: If you set a goal to “Anywhere,” a contact can achieve that goal from any position in the automation. This configuration allows contacts who meet the criteria to flow both downward and upward in the automation. You will most commonly use this configuration when your automation contains If/Else conditions that result in multiple paths.
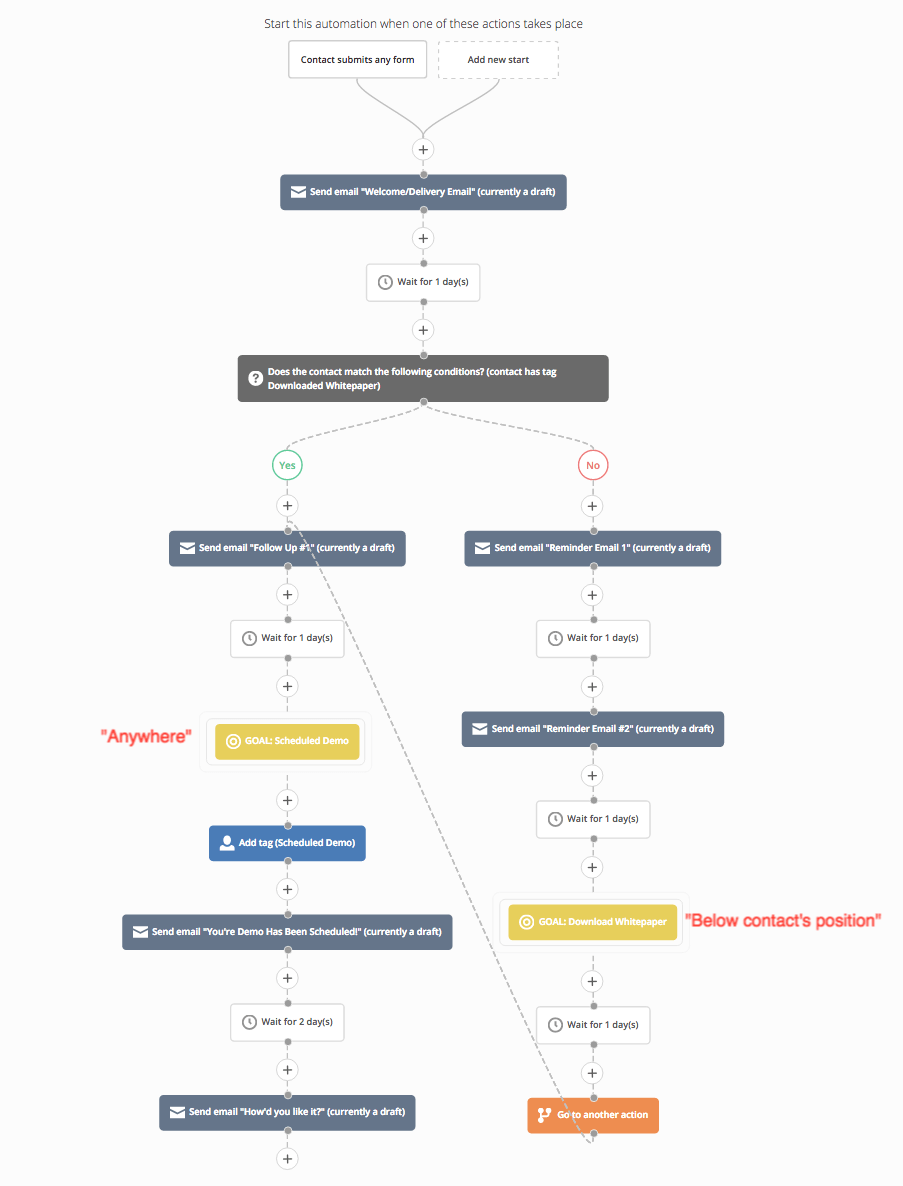
Here is an automation with two goals—one set to “Below contact’s position,” and the other set to “Anywhere:”
The “Scheduled Demo” goal in the “Yes” path has a location configuration of “Anywhere.” Contacts in the “No” path of the If/Else condition who meet that goal are automatically moved to that stage in the automation, despite their position below it and/or in an adjacent path.
Alternatively, contacts in the “No” path who are below the “Download Whitepaper” goal are not redirected to that goal if they download the whitepaper. Instead, the “Go to another action” action sends them to the beginning of the “Yes” branch. Thus, time is saved, and you don’t risk losing a potential customer due to confusing, redundant interactions.
Action
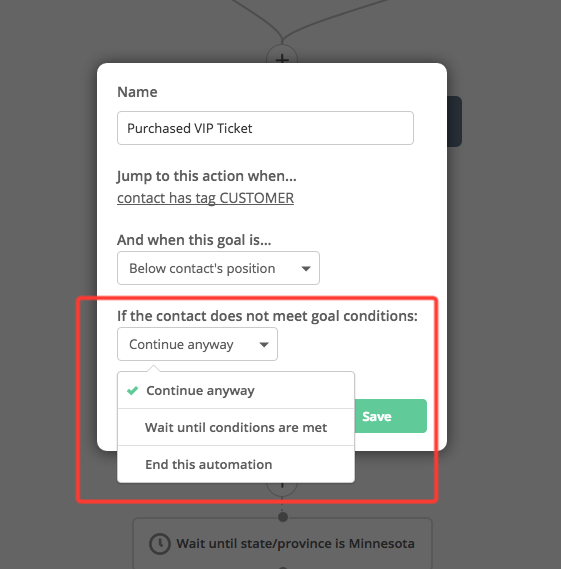
Lastly, you need to specify what you want to happen next for contacts who arrive at the goal but do not meet the criteria. There are three options, each of which takes effect immediately after the contact reaches the goal:
- Continue anyway: When contacts reach the goal, they proceed in the automation whether they meet the criteria or not.
- Wait until conditions are met: Contacts remain at the goal step in the automation until they meet the goal criteria. There is no limit to how long contacts can wait at a goal that is configured with this option.
- End automation: At this step, the automation is ended for contacts who have not achieved the goal.
Note: These options only apply to contacts who do NOT achieve the goal. Contacts who do achieve the goal simply continue through the automation unaffected by the selected configuration.
Best Practices for Using Goals
Aside from understanding how to configure goals, here are some important principles to keep in mind:
- One-time achievement: If a contact achieves a goal, that achievement is permanent. That is, goal-fulfilled contacts always skip to the goal position the moment they enter the automation.
- Connected path not required: Goals do not need to be on a connected path in order for the contact to jump to the goal and advance through. The automations pictured below achieve the same outcome when the “Enrolled in Course” goal is met.
- No outsiders: In order to achieve a goal, a contact must be in the same automation the goal is in. If a contact meets the goal criteria but is not in the automation, that data will not be included in the goal’s completion rate.
We do our best to provide the most flexible, powerful, and comprehensive goal editor. Understanding goals will help you build simpler, easier to follow, and more effective automations. We recommend thoroughly testing your automations to ensure they work as planned.
Are you using goals in your automations? If so, share some of your use cases below. If not, let us know how we can help you implement them.


